Thursday, December 17, 2009

Tales of Cowboy Kringle & Cranberry Jelly

I had great plans for postings this month...like actually posting more than one post! Gee, what happened? I suppose I've been trimming the tree, making cookie dough to freeze (not baked yet), toying with an old family recipe, shopping and visiting Cowboy Kringle.

You heard me correctly, Cowboy Kringle. Not too far from my home, Cowboy Kringle sits atop bales of hay, looking mighty jolly wearing a cowboy hat, boots and red leather chaps. My little Eli had a wonderful first Christmas picture with him last year. This year...not so much.
I have been showing him images of Santa for weeks now, in effort of making him comfortable with his upcoming picture. I'd bellow out "Ho Ho Ho!!! Merry Christmas!" and he laughed every time. When we arrived to Cowboy Kringle's stable, he was very excited. I thought, oh yeah, this is going to work. Again, not so much.

The moment he was placed on the big red chaps...tears, crying, moaning! Which was fine with me. I actually love my sons "cry face." We chose the picture of Eli on the verge of crying-he somewhat resembles the "Stay Puff't Marshmallow Man."

Eli and Cowboy Kringle Christmas '08 (top); Christmas '09 (bottom)
After the picture torture, Cowboy Kringle belted out a big "HO HO HO! Merry Christmas!!!" Eli looked at me, jumped off of my lap and ran toward the big man in red, joining in another family's photo. WHAT!?!

OK, recipe time! This is my attempt to recreate a cranberry jelly that was given to me by a former neighbor. She was a personal chef for an Idaho senator and her jelly was the best I've ever tasted. Not only is it mighty tasty, but the beautiful color is as rosy as Cowboy Kringle's jolly cheeks!

Cranberry Jelly
makes approx. 7 cups

4 cups store bought 100% cranberry juice (I use Northland)
2 T. lemon juice
4 cups sugar
1 1/2 pouches of liquid pectin
  1. Put cranberry juice, lemon juice and sugar into a large stockpot. Bring to a rolling boil. Add liquid pectin; return to a rolling boil, and cook for 2 minutes.
  2. Immediately transfer jelly to sterilized jars and top with sterilized lids. Alternatively, transfer jelly to a large bowl set over an ice-water bath to cool; refrigerate in an airtight container up to one month.
  3. Process jars in pots of boiling water for 5 minutes. When canning in elevations over 1000 ft. sea level, please adjust processing time.
Its seems that every time I can, I need a refresher course. You can find canning guidelines here.

Friday, December 4, 2009

Where Caramel Meets Pound Cake

...and make beautiful music! Where, you may ask? In my kitchen of course. This dessert is unbelievable and I was pleasantly pleased with the outcome.
It is a dense, moist and tender cake with a delicate butterscotch flavor (thanks to the brown sugar). My husband said I should rename it the "five pound cake" because it was quite heavy. The icing was sweet, thick and luscious. It had a deep, caramel flavor (thanks to more brown sugar) that was just incredible.

I followed the recipe exactly, because I had read a review that was very adamant about following it down to the T. I was afraid if I didn't, it would be a "five pound" tragedy. Well, obviously it wasn't, but I'd tweak the icing. It is THICK and SWEET and I didn't even use as much confectioners sugar as called for. So next time-I'll use less. I am submitting the original recipe, so you can follow it or tweak it-whatever satisfies that sweet tooth. Regardless, I hope this dessert makes it onto your holiday table this year. It deserves to be featured!

I hope everyone had a wonderful Thanksgiving and is gearing up for Christmas. I am running so behind this year! I still need to finish decorating the house. I've made sugar cookie dough, spice cookie dough and found Log House Cherry Morsels for Cherry Mash (yeah!)
Caramel Pound Cake
10-12 servings
Source: Saveur Issue #109

For the cake:
3 sticks butter, at room temperature, plus more for pan
3 1/2 cups flour, plus more for pan
1 tsp. baking powder
1/2 tsp. fine salt
2 cups packed light brown sugar
1 1/2 cups granulated white sugar
6 large eggs, at room temperature
1 1/2 cups whole milk, at room temperature

For the icing:
1 stick butter
1 cup packed dark brown sugar
1/2 cup milk
1/2 tsp. pure vanilla extract
4 cups confectioners' sugar, sifted

1. To make the cake: Heat oven to 325ยบ. Butter and flour a light-colored 10-inch fluted tube pan, making sure there are no clumps of butter or exposed areas in pan; set aside.

2. Sift together flour, baking powder, and salt into large bowl and set aside. In the bowl of a standing mixer with a paddle set on medium speed, cream 3 sticks of butter until fluffy, about 2 minutes. Add the light brown and white sugars and mix, stopping and scraping down the bowl with a rubber spatula occasionally, until lightened and smooth, about 5 minutes. Reduce speed to medium-low and add eggs, one at a time, beating for about 15 seconds after each addition and scraping down the bowl occasionally, until well blended. Do not overmix. Reduce speed to low and add the flour mixture and 11/2 cups milk alternately, in 3 batches, beginning and ending with flour; beat until smooth, about 3 minutes total.

3. Scrape the batter into the prepared pan and bake in the center of the oven until a wooden skewer inserted in the center comes out clean, about 1 hour and 10 minutes. Do not overbake. Let cake cool in the pan on a wire rack for at least 30 minutes. Loosen edges with a small knife, then turn onto rack to let cool completely.

4. To make the icing: Melt remaining stick of butter in a large heavy saucepan over medium heat. Add dark brown sugar and whisk constantly until mixture is bubbling and smooth and butter is completely incorporated, about 3 minutes. Remove from heat and whisk in remaining 1/2 cup milk. Let mixture cool. Stir in the vanilla, then gradually add the confectioners' sugar and stir until well blended and smooth. Transfer cake to a cake plate and ice with frosting. Let stand for at least 2 hours before slicing.

Monday, November 23, 2009

Kick The Can-Try Real Cranberry Sauce

Don't get me wrong, I have no qualms about canned cranberry sauce. It is tart, tangy, sweet, has a cool canned shaped appearance and such a wonderful squishy texture in your mouth. Don't get me wrong its pretty good but I love the real deal so much better.

So for those of you who are part of the canned coalition, I urge you to take 15 minutes out of your busy holiday schedule and make real cranberry sauce. It may become a holiday staple once you find out how simple it is.

Real Cranberry Sauce
originally posted 11.15.08 The Seven Million Wonders of The World
  • 1 (16-ounce) bag frozen cranberries, thawed
  • 2 oranges, juiced (enough for 1 cup of liquid) and 1 orange zested
  • 1/2 c.-1 c. light brown sugar (depends on how sweet you want it)
  • dash of salt
  • 1 cinnamon stick

Combine all of the ingredients in a saucepan and simmer until the cranberries just begin to burst, about 15 minutes. Transfer to serving dish and chill.

Monday, November 16, 2009

One Box of Puff Pastry, Dinner and Dessert for Six

The holiday season is upon us and that means a lot of guests will be knocking at our doors...whether we expect them or not! It seems that my pantry and freezer is amply stocked during the last quarter of the year. Some years I've needed it and others, well, not so much.

I do enjoy having guests in my home. In fact, I wish I would host more often. For the most part every guest has been a joy to have over, but I have had a doozy or two as well.

And speaking of doozies, let me introduce you to "Guest". Guest arrived at my door two days early (unannounced.) I was very glad to see Guest but was somewhat irked that I had not been forewarned. The guest room still needed to be tidied, food needed to be bought and the house needed to be picked up. Believe it or not, Guest was offended that dinner was not piping hot out of the oven upon their arrival. We took Guest out to dinner and rather than asking me if they could sit by the window, they grabbed the hood of my jacket as I was sitting down and yanked me out of the booth. I was mortified, other diners had witnessed...strike one.

As days passed we had a great time enjoying each others company. I did however cringe at the sight of unflushed toilets and fingernails spit across my living room floor (strike two and three.) What was even worse, Guest did not have plans to leave. I simply was told, "Just tell me when you want me to go." How awkward is that??? Guest left a day earlier than expected (really not on good terms...OK, hubby coaxed Guest out), but we still talk every now and then.

Mmmmm...so I noticed I mentioned dirty toilets and fingernails spit upon a floor in a food blog. How appealing is that? Nevertheless I have two great recipes that will knock your guests socks off (invited and uninvited.) Frozen puff pastry is a staple in my freezer and with a box you can create a rustic tart and a steamy, comforting and inviting chicken pot pie.

Chicken Pot Pie
  • One sheet of frozen puff pastry, thawed
  • One 3-4 pound rotisserie chicken, meat shredded into bite size pieces
  • 9 oz. red potatoes, cut into 1/2 inch pieces
  • 5 T. unsalted butter
  • 1 leek, sliced into thin rounds
  • 2 carrots, sliced 1/4 inch thick
  • 6 oz. cremini mushrooms
  • 5 T. flour
  • 1 c. milk
  • 2 c. chicken stock
  • 2 T. thyme
  • 2 T. parsley
  • Coarse salt and pepper
  • 1 large egg yolk
  • 1 T. heavy cream
  1. Melt butter in a large skillet over medium heat. Add potatoes and cook, stirring occasionally, until potatoes begin to turn golden, 4-5 minutes. Add leek, carrots, mushrooms, then cook 4-5 minutes more. Add flour, and cook, stirring, for 1 minute.
  2. Stir milk and chicken stock into pot; bring to a simmer. Cook until thick and bubbly, stirring constantly, 2-3 minutes. Add chicken meat, thyme and parsley; season with salt and pepper. Transfer filling to a deep 10-inch glass pie dish. ***Steps 1 &2 can be made one day ahead; let cool completely, then cover pie dish with plastic wrap and refrigerate.
  3. Preheat oven to 425 degrees Fahrenheit. In a small bowl, whisk together egg yolk and cream; set aside. Unfold thawed pastry on a lightly floured surface. Roll out dough to a 10-inch square. Cut out a steam vent in the center of the pastry using a small coolie cutter. Lay pastry over the pie dish, and press onto filling. Brush dough with egg wash, sprinkle with salt and pepper. Freeze until firm, 30 minutes.
  4. Place pie dish on a rimmed cookie sheet; bake 5 minutes. Reduce oven temperature to 400 degrees Fahrenheit; continue baking until crust is puffed and golden brown and juices are bubbling, 15-20 minutes more. Let cool 5 minutes.
Rustic Apple Tart

  • One sheet of frozen puff pastry, thawed
  • Flour, for work surface
  • 3 granny smith apples
  • 1/3 c. sugar
  • 1 t. cinnamon
  • pinch of each; cloves and nutmeg
  • 1 egg yolk beaten with 1 tsp. of heavy cream, set aside
  • 2 T. unsalted butter, cubed
  • 2 T. apple jelly
  1. Preheat oven to 375 degrees. On a lightly floured work surface, roll out pastry sheet to a 10-by-10-inch square. Trim 3/4 of an inch off the edge with a pizza cutter or sharp paring knife, creating strips for the tart shell. Transfer to a baking sheet; place in freezer. Peel, core, and slice apples 1/4 inch thick. Toss in a large bowl with sugar, cinnamon, nutmeg and cloves.
  2. Brush outer border of tart base with egg wash and adhere the trimmed strips to the tart. Place apples inside border, and dot with butter. Brush the exposed pastry border with egg wash. Bake until pastry is golden and apples are tender, 30 to 35 minutes.
  3. In a small saucepan, heat jelly with 1 tablespoon water until melted. Brush apples with glaze. Serve tart warm or at room temperature, cutting into pieces with a serrated knife

Monday, November 9, 2009

Holiday Fruit Salad

I can honestly say that I have never prepared a Thanksgiving turkey! Can you believe it! I suppose it is because I have never hosted a Thanksgiving Dinner and am always a guest. So what to bring, what to bring when you are one's guest???

The homes I usually travel to never assign a dish (green veggie, starch, dessert, salad, etc.) Sometimes I think it would be easier if they did. That way, when you approach the buffet you are not greeted with a myriad of green bean casseroles!

Lately, I've been bringing salad and fresh vegetables to potlucks. Though these are staple dishes at my home, they seem not to be at my friend's and family's kitchens. A simple saute of blanched green beans and garlic has been the star of the buffet table at many functions-the "recipe" has been requested by many. I was somewhat taken aback because it is so simple.

Last year as I was poaching pears I thought about making a poached fruit salad. I simply added my poaching spices to simple syrup, poured it over acidulated sliced apples and the lone pear left in my refrigerator, raided my staple of dried fruit and voila! A handful of pomegranate seeds (dried cranberries looked too wrinkly-if that's the word I'm going for) thrown over the top of the salad and a star was born.

Holiday Fruit Salad
1 cup of sugar
4 cups of water
1/2 vanilla bean, split in half
1 cinnamon stick
3 peppercorns
3 cloves
1 bayleaf
4 2-inch long pieces of lemon and/or orange zest
Juice of one lemon
8 dried apricots, quartered
6 dried figs, quartered
3 firm Granny Smith Apples
1 firm Bosc Pear
pomegranate seeds for garnish
  1. Fill saucepan with 4 cups of water. Add the sugar, vanilla bean, cinnamon stick, peppercorns, cloves, bayleaf and zest. Bring to a boil and cook until sugar has dissolved. Let sugar syrup cool for 5-10 minutes and add dried apricots and figs to the warm syrup. Let it cool completely.
  2. Peel, slice and core apples and pear. Slice thinly and place in a large bowl, toss with lemon juice.
  3. Pour cooled syrup over apples and pears. (you can strain syrup to remove poaching spices-I only kept the zest and vanilla bean for decoration) Cover the bowl with plastic wrap and refrigerate overnight.
  4. Using a slotted spoon, ladle fruit into a serving bowl, sprinkle with pomegranate seeds and serve.

Tuesday, November 3, 2009

'Wich Craft

Once people find out my ties to food (baker, pastry chef, amateur food blogger) I'm often asked what is my favorite thing to eat. I always end up drawing a blank and my answer seems to be very broad...general...and yes, boring. The answer that usually is to follow is: I don't have a favorite.

What a LIE! It isn't until several hours later that a light clicks on in my head and the answer is revealed (and I am reminded)-the sandwich. I LOVE sandwiches.

I think for many, the appeal of food is the combination of flavors, layers and different textures. Well, isn't that a sandwich?

The perfect sandwich, for me, has to be toasted. It has to have buttery Havarti and turkey, preferably smoked turkey breast and a combination of sweet and savory-something along the lines of cranberry. Of course, color is important too!

My husband and I often frequented a sandwich shop across from the university where he worked. I always ordered #22, turkey with cream cheese and avocado. I really liked it, but it needed a kick. Here is my version of #22, which is perfect for using those Thanksgiving leftovers.

My Favorite: Turkey Sandwich
  1. Start out with two slices of good bread (crusty on the outside, chewy on the inside). I use a French loaf. Lightly drizzle one side of each slice with olive oil. Lay slices oiled side down. Lets start building our sandwich!!!

  2. Spread room temperature cream cream over the slices of bread. Top cream cheese with slices of Havarti cheese.

  3. Add a layer of sliced, smoked turkey breast to the top of one of the slices of bread. Add slices of avocado on top of the turkey.

  4. Slather a layer of cranberry sauce on the other slice of bread. Combine slices together and press down slightly.

  5. Place in a preheated sandwich/panini press and press and cook for about 7 minutes or until heated through and cheese has melted.

Thursday, October 29, 2009

Popcorn Balls-Happy Halloween

I had plans to write something fun, witty, spooky, "Halloweeny"...but my brain is exhausted and I can't think clearly enough to write something worth while. My plans were foiled when my popcorn popper decided to bite the dust in the middle of making these great treats. So I'm reposting an entry from my family blog site. I hope you make these for your little ghosts and goblins!

Original Post: Seven Wonders Of The World, October, 2008.

Happy Halloween. . . well almost. Popcorn balls have a special place in my heart. My Nanny always made them every Halloween and yes it was exciting to go to her house to show off our costumes but it was equally (or more) exciting to sink our teeth into the sugary, sweet, crunchy and sticky goodness known as the popcorn ball.
This first recipe is for the traditionalist. It calls for a sugar syrup poured over freshly popped popcorn and formed into baseball sized balls. I use an aluminum roasting pan to avoid clean up.
Grandma Anderson's Popcorn Balls:
2 cups sugar
1/2 cup white syrup
1/2 tsp. salt
1 tablespoon vinegar
1 tsp. vanilla
1/2 cup water
3 qts. popped popcorn (9 tablespoons of unpopped kernels)
  • Boil sugar, syrup, salt, vinegar, vanilla and water to soft ball stage or 250 degrees on candy thermometer
  • Pour sugar mixture over popcorn that has been placed in aluminum roasting pan (let cool before forming with buttered hands)
  • Shape into baseball or small softball sized balls
The second recipe is for the kid in all of us. It has a marshmallow base, rather than syrup and has a hint of caramel from the brown sugar. Oh-and chocolate! How bad can that be?

Marshmallow Popcorn Balls
4 T. unsalted butter
1 ten oz. bag miniature marshmallows
1/4 c. light brown sugar, packed
3 qts. popped popcorn
1 c M&Ms

  • Place popped popcorn and M&M's into an aluminum roasting pan.
  • Melt butter in heavy pot over low heat. Add marshmallows and brown sugar, stir until melted. Remove from heat. Let cool for 2-3 minutes
  • Pour over popcorn and M&Ms; toss well. With buttered hands, shape into balls.
*I found that spraying your hands with non-stick spray works really well when shaping balls. Keep it on the counter and spray as needed.

Sunday, October 25, 2009

Pumpkin Pancakes & Pumpkin Smoothie


Hmmmm???Which pumpkin shall I pick???

My 13 month old is a picky eater. But then again, I've come across alot of moms with finicky toddlers, so I know I'm not alone. From the beginning he immediately snubbed his nose at jarred food, refused any type of meat and only ate Tyler Florence's Sprout baby food. Tyler was a saving grace, though I have prepared many items that Eli just L-O-V-E-S. So, I thought I'd share them with you since they are very "fall"-after all!

I've been playing around with pumpkin and adding it to many of Eli's dishes. He loves pumpkin mac-n-cheese (and I admit I do too!), slurps down pumpkin smoothies and chows down on these beautiful pumpkin pancakes. Toddler approved, but I'm sure any adult can enjoy them too! And why not? Pumpkin is a super food...super food for a super boy. (Sorry, I had to throw that in...I just love my baby boy!)

Pumpkin Pancakes
yields: 2 dozen silver dollar pancakes
1 3/4 c. whole wheat flour
1 T. baking powder
1/2 t. salt
2 t. cinnamon
1/2 t. ground ginger
1/4 t. allspice
1/4 t. nutmeg
1 1/3 T. sugar
2 eggs
1 c. pureed pumpkin
1 t. vanilla
2 c. milk
  1. Sift flour, baking powder, salt, cinnamon, ginger, allspice, nutmeg into a medium sized bowl.
  2. Add sugar, eggs, pureed pumpkin, vanilla and milk and whisk until smooth.
  3. Add spoonfuls (I used my trusty cookie sized ice cream scooper) to a lightly oiled and heated griddle. Turn pancakes over once bubbles have formed and tops look like they are drying.
Autumn Smoothie
yield: one for Mom and one for Baby!
1/2 c. vanilla yogurt
1/2 c. vanilla soy milk
1/4 c. canned pumpkin
1/4 c. applesauce
1/2 t. cinnamon
1/4 t. nutmeg
dash of ginger
1 frozen banana
  1. Combine in a blender and blend until smooth.

Thursday, October 15, 2009

Pecorino And Bean Salad

First of all I know what you're thinking...what??? a salad??? I love salads and I have no idea why I never feature them on the blog. Probably because I end up chowing down on them immediately after I make them-therefore no picture to display.

I saw this recipe as I was watching the beautiful Giada one morning and was intrigued. The colors are so beautiful and the salad does look rather elegant for beans and cheese. Every component in this salad appeals to my senses, therefore I had to make it right away.

I love edamame still nestled in its pod, dipped in salt and ready for it to be popped into my mouth. I adore creamy cannellini beans and my kitchen is never without garlic, parmesan or pecorino romano cheese. (My husband would tell you we live off of parm!) But never would I have thought to combine them together. And I must say with the creaminess of the cannellinis, the tender bite of the edamame, saltiness from the Pecorino and the woodsy aroma of rosemary...it is a match made in heaven.

Pecorino and Bean Salad

Source: Giada At Home

Ingredients

  • 2 tablespoons extra-virgin olive oil
  • 2 cloves garlic, minced
  • 2 teaspoons finely chopped fresh rosemary leaves
  • 2 cups (9 ounces) shelled edamame beans
  • 1 (15-ounce) can cannellini beans, drained and rinsed
  • 5 ounces pecorino, cut into 1/2-inch chunks
  • 1/4 cup chopped fresh flat-leaf parsley
  • 1/4 teaspoon kosher salt
  • 1/4 teaspoon finely ground black pepper

Directions

In a small, nonstick skillet, heat the oil over medium-low heat. Add the garlic and cook until fragrant, but not brown, about 30 seconds. Remove the pan from the heat and stir in the rosemary. Set aside.

Combine the edamame beans, cannellini beans, cheese, parsley, and salt and pepper in a serving bowl. Add the garlic mixture and toss well until all the ingredients are coated.

Friday, September 25, 2009

Longing for Autumn-Sticky Buns

As I look out my window I see a gray and overcast sky. It has been raining (finally) for days now and the hot Texas sun has been replaced with cool drizzle and a slight breeze. Should I be happy that this is a sign of a Texas Fall? Growing up in Texas I didn't realize that our autumn ran parallel to what many consider an Indian Summer. It really isn't that impressive of a season.

I didn't know what a *real* autumn was until three years ago. My husband and I moved to Idaho and by mid September we were greeted with true autumnal beauty. The forest roads were lined with shimmering golden aspen trees that delicately danced in the wind atop white bases. Vibrant red trees bled from the small western range that lined the city. Porches were decorated with pumpkins and orange, purple and russet colored chrysanthemums grace the steps to the front door. And the wind. The wind was brisk, crisp and carried a chill to remind us that the first snowfall would soon be near. In that moment I fell in love with autumn.


I love seasonal autumn fare as well. And there is nothing like waking up on a brisk morning and have these warm, gooey, scrumptious sticky buns meet your fingertips. The first time I made these it was love at first bite. Sweet, sticky, gooey, soft and crunchy all rolled into one (literally).

This recipe comes from Foster's Market located in Durham, NC. I use her refrigerator roll recipe as suggested and am tempted to use my grandmother's roll recipe instead. I tweaked it by soaking the raisins in rum. My godmother makes the sticky and uses Pillsbury's cinnamon rolls for a quick shortcut. Either way its done, its guaranteed to be finger lickin' good.

Foster's Market's Killer Pecan Sticky Buns

2 tablespoons unsalted butter, softened
½ recipe Granny Foster's Refrigerator Rolls (recipe follows)
¾ cup raisins
¼ cup rum
1 teaspoon ground cinnamon
1¼ cups firmly packed light brown sugar
8 tablespoons (1 stick) unsalted butter, melted
½ cup honey
¾ cup coarsely chopped pecans

1. Preheat the oven to 350 degrees.

2. Grease a deep 9-inch round glass baking dish with the softened butter and set aside.

3. Remove the refrigerator roll dough from the refrigerator, punch it down, cover loosely with a tea towel or plastic wrap, and set aside to rest for 15 to 20 minutes.

4. Combine the raisins andrum in a bowl and set aside to soak 20 to 30 minutes, until plumped.

5. Stir together the cinnamon, ½ cup of the brown sugar, and the butter in a separate bowl and set aside.

6. Stir together the remaining brown sugar, the honey, and the pecans in a separate bowl. Spread this mixture evenly in the bottom of the glass baking dish and set aside.

7. Roll the dough out on a lightly floured surface into a 12 by 6-inch rectangle about ⅛ inch thick. Spread the brown sugar-butter mixture evenly over the center of the dough, leaving about 1 inch of exposed dough all the way around. Drain the raisins and sprinkle them over the brown sugar-butter mixture.

yield: about one dozen

Granny Foster's Refrigerator Rolls
yield:2 1/2-3 dozen rolls

½ cup warm water (105 to 115 degrees)
One ¼-ounce package active dry yeast
½ cup sugar
8 tablespoons (1 stick) unsalted butter
2 cups milk
1 teaspoon salt
6 ½ cups all-purpose flour
4 tablespoons (½ stick) unsalted butter, melted

1. Grease a baking sheet and set aside.

2. Place the warm water, yeast, and about 1 teaspoon of the sugar in a small bowl; stir once or twice just to mix. Let stand in a warm place for 5 or 7 minutes, until small bubbles form on top.

3. Meanwhile, in a saucepan, combine the butter, milk, salt, and remaining sugar and cook over very low heat, stirring constantly, until the sugar dissolves and the butter melts. Do not let the mixture go over 115 degrees or it will kill the yeast; it should be just warm enough for the sugar to dissolve. Remove from the heat and pour the mixture into a large bowl.

4. Add the yeast mixture to the milk mixture and stir until combined. Stir in about 6 cups of the flour and mix until the mixture forms a soft dough. Add the remaining flour if the dough is still sticky.

5. Remove the mixture from the bowl and knead on a lightly floured work surface 5 to 8 times, until dough forms a ball or comes together.

6. Lightly oil a large bowl and place the dough in the bowl; cover with a tea towel or plastic wrap and let rise in a warm place for 30 to 45 minutes, until the dough has doubled in bulk.

7. Punch down the dough and divide it into 2 equal pieces. Place the pieces on a work surface and cover loosely with a tea towel or an inverted bowl and let rest 5 to 10 minutes. (The dough can be refrigerated in an airtight container until ready to use at this point. Remove from the refrigerator and let rest for 15 to 20 minutes, then proceed as the recipe directs.)

8. Preheat the oven to 375 degrees.

9. Working with a piece of dough at a time, roll out on a lightly floured work surface until ¾ to 1 inch thick. Cut with a 2½-inch round biscuit cutter.

10. Place the rolls on the prepared baking sheet and let rise 20 to 25 minutes more, until the rolls have doubled in bulk. (It may take 10 to 15 minutes longer for dough to rise if it has been refrigerated.) Brush the tops lightly with melted butter. Repeat with the remaining dough.

11. Bake 20 to 25 minutes, until golden brown. Remove from the oven and serve immediately.

Thursday, September 10, 2009

I'm Your Huckleberry (Crisp)


Before I moved to Idaho the extent of my huckleberry knowledge included Huckleberry Hound, Huckleberry Finn and the infamous Tombstone line "I'm your huckleberry." Growing up in the south the image of a blue dog with a southern drawl, a young boy setting afloat on the Mississippi or Val Kilmer's "Doc" (still looking rather handsome despite the tuberculosis) is what one would imagine before thinking of an actual berry. We know of and probably have picked blueberries and dewberries, but not huckleberries.

I came across the actual berry at the South East Idaho Farmers Market one crisp early autumn day. Amongst the mounds of potatoes, trailers of gourds, squash and pumpkins sat a tiny table displaying a mass of mason jars glistening with berries. It caught my attention. They resembled the blueberry but were darker and smaller. The taste was similar to a blueberry as well, but had a unique astringency to it. Intrigued, I bought a jar and ended up making this peach and huckleberry crisp.

Peach and Huckleberry Crisp
adapted from : Ina Garten

Ingredients
  • 4 to 5 ripe large peaches
  • 1/2 orange, zested
  • 1/2 c. plus 1/8 c. cups granulated sugar
  • 1/2 cup light brown sugar, packed
  • 3/4 cups plus 1 to 2 tablespoons all-purpose flour
  • 1 cup huckleberries
  • 1/8 teaspoon salt
  • 1/2 cup quick-cooking oatmeal
  • 1/4 pound cold unsalted butter, diced
Directions
Filling
  • Preheat the oven to 350 degrees F. Butter the inside of a 10 inch round baking dish. Cut a small X just through the skin of the peaches.
  • Immerse the peaches in boiling water for 30 seconds, then place them in cold water. Peel the peaches and slice them into thick wedges and place them into a large bowl.
  • Add the orange zest, 1/8 cup granulated sugar, 1/4 cup brown sugar, and 1 tablespoons of flour. Toss well.
  • Gently mix in the huckleberries. Allow the mixture to sit for 5 minutes.
  • If there is a lot of liquid, add 1 more tablespoon of flour. Pour the peaches into the baking dish and gently smooth the top.

Crumb Topping

  • Combine 3/4 cups flour, 1/2 cup granulated sugar, 1/4 cup brown sugar, salt, oatmeal, and the cold, diced butter in the bowl of an electric mixer fitted with a paddle attachment.
  • Mix on low speed until the butter is pea-sized and the mixture is crumbly.
  • Sprinkle evenly on top of the peaches and huckleberries.
  • Bake for 1 hour, until the top is browned and crisp and the juices are bubbly. Serve immediately, or store in the refrigerator and reheat in a preheated 350 degree F oven for 20 to 30 minutes, until warm.

Tuesday, August 25, 2009

Fresh Mint Ice Cream


I love cooking with herbs. I had a beautiful potted herb garden several years ago and miss it dearly. It was brimming with an abundance of mint, pine scented rosemary, nasturtiums, thyme and lemon thyme with beautiful golden leaves.

My father in law has such a wonderful array of herbs in his garden. Sage, oregano, basil, parsley and mint to name a few. Before I left their home last weekend I clipped some sage for my Wednesday night roasted chicken, basil for my marinara sauce and mint for this mint chocolate chunk ice cream. (By the way, it was the most pleasant scented ride home I had ever experienced!)

When I tasted the custard a cloud of doubt draped over me. It had a "grassy" taste. But once churned it was not as strong. If you are looking for an ice cream that tastes like those you buy from the store or tastes similar to candy-this is not the recipe for you. If you love the hint of fresh herbs-then you've got to try this.

This ice cream is very fresh tasting and creamy. There is not a drop of food coloring or extract to be found. Its pale green color and pure flavor come from a cup of fresh picked mint. Chocolate chunks add a nice snap and sweet finish to this cool, creamy and sprightly flavored ice cream.

Fresh Mint Ice Cream
(adapted from Martha Stewart Living)
Makes 3 cups; 4-6 servings
1 c. fresh mint, packed
1 c. whole milk
2 c. heavy cream
2 large eggs
3/4 c. sugar
4 oz. semisweet chocolate, coarsely chopped
  1. Prepare an ice-water bath. Cook mint in a small saucepan of boiling water until bright green, about 1 minute. Using a slotted spoon, transfer mint to ice-water bath. When cool, drain and squeeze out excess water. Reserve ice-water bath.
  2. Puree mint and milk in a blender until mint is finely chopped. Transfer to a medium saucepan, add cream, and bring to a simmer over medium heat.
  3. Meanwhile, whisk together eggs and sugar in a medium bowl.
  4. Gradually whisk 1/3 of the cream mixture into the egg mixture, then pour egg-cream mixture into the saucepan with the remaining cream mixture. Set over medium heat, and cook, stirring constantly with a spoon, until thick enough to coat a spoon, about 8 minutes. (Do not let it come to a simmer.)
  5. Strain through a fine sieve into a heatproof bowl, pressing on mint to extract liquid. Set bowl in ice-water bath. Let cool completely, stirring occasionally. Freeze in an ice cream maker according to manufacturer's instructions. Add chocolate during the last 5 minutes of churning.
  6. Transfer to an airtight container, and freeze until firm, about 4 hours (or up to a week).

Tuesday, August 4, 2009

A Tiny Cake For A Big Birthday Month


August is a big birthday month for my family. My sister, her husband, my husband's two older brothers and my son were all born in the month of August. In honor of this busy birthday month I am featuring a tiny cake. This cake is a mere 4 inches of moist, golden, yellow cake delicately frosted with chocolate buttercream.

Many people in my family fore go the birthday cake and choose another dessert. My husband, for instance would much rather eat cobbler, brownies or pie. Though not birthday related he chose a trio of cheesecake for the groom's cake at our reception.

My youngest sister celebrates her birthday in November and it is not uncommon to find a pumpkin pie in place of a birthday cake. This year I opted for a birthday fruit tart filled with pastry cream and topped with apricot glazed berries, kiwi, grapes and oranges.
What would you rather eat? Cake? Cobbler? Pie?

I cut the original recipe in half and made (4) four inch cakes. I couldn't see two people take down a nine inch cake alone. It was tiny and perfect!

Yellow Butter Cake
yield: four 4" cakes-can easily be doubled
source: marthastewart.com
  • 1 stick unsalted butter, room temperature, plus more for pans
  • 3/4 cups all-purpose flour, plus more for pans
  • 3/4 cups cake flour (not self-rising)
  • 1/2 tablespoon baking powder
  • 1/4 teaspoon salt
  • 3/4 +1/8 cups sugar
  • 2 large eggs
  • 1 teaspoons pure vanilla extract
  • 1/2 + 1/8 cups milk
  1. Preheat oven to 350 degrees. Butter four 4" round cake pans; line the bottoms with parchment paper. Butter parchment, and dust with flour, tapping out excess; set aside. Into a medium bowl, sift together flours, baking powder, and salt; set aside.
  2. In the bowl of an electric mixer fitted with the paddle attachment, beat the butter and sugar until light and fluffy, 3 to 4 minutes, scraping down the sides of the bowl as needed. Beat in eggs, one at a time, then beat in vanilla. With the mixer on low speed, add the flour mixture in three parts, alternating with the milk and beginning and ending with the flour; beat until combined after each addition.
  3. Divide batter between the prepared pans, and smooth with an offset spatula. Bake, rotating the pans halfway through, until cakes are golden brown and a cake tester inserted into the center comes out clean, 25 to 30 minutes. Transfer pans to a wire rack to cool 20 minutes. Invert cakes onto the rack; peel off the parchment. Reinvert cakes and let them cool completely, top sides up.
Chocolate Buttercream Frosting
adapted from Barefoot Contessa Cookbook
4 oz bittersweet chocolate
4 oz semisweet chocolate
1/4 c. egg whites, room temperature
1/2 c. sugar
pinch cream of tartar
1/4 t. salt
1/2 pound unsalted butter, room temperature
1 t. vanilla extract
1 T. Bacardi golden rum
  • Chop chocolates and melt in a bowl over simmering water until melted. Allow to cool.
  • Mix egg whites, sugar, cream of tartar, and salt in the bowl of an electric mixer fitted with a whisk. Heat egg whites in the bowl over simmering water until they are warm to the touch and sugar is no longer grainy (about 5 minutes). Whisk on high speed until mixture is cooled and hold a stiff peak.
  • Add butter, 1 tablespoon at a time, while beating at medium speed. Scrape down the bowl, add chocolate, vanilla and rum and mix until chocolate is completely blended.

Wednesday, July 22, 2009

Fruit Tart


I have been a bad, bad blogger. I have completely neglected my blog and yours, but now I'm back. I'm totally blaming it on being entranced by the Twilight book series. Well, the first three books, I should have laid the last one down and tended to the blog because it was a total let down.

Please accept my apology with this delicious and
summery fruit tart. The crust is a wonderful shortbread crust. The filling is a sweet, smooth, delectable pastry cream that is sure to please. Is it wrong that I can be found standing in front of an opened refrigerator eating spoonfuls of pastry cream out of the container??? Such a temptation and it does happen!

I decorate the tart as if I would arrange a fruit basket or platter. I finish it off by brushing apricot glaze atop the berries.


On a totally unrelated note...once you've visited me stop by and visit Sharon at Culinary Adventures Of A New Wife. Not only is it a great blog and is featuring a fabulous pasta dish at the moment but there is also a contest winning recipe submitted by yours truly in her current post! Sharing recipes is so great.

Fresh Fruit Tart

Pastry Shell
Fits a 9 inch tart pan
Barefoot Contessa Cookbook

3/4 c. unsalted butter, room temperature
1/2 c. sugar
1/2 t. vanilla extract
1 3/4 c. flour, sifted
pinch salt
  • Preheat oven to 350 degrees
  • In a bowl of an electric mixer, fitted with paddle attachment, mix butter and sugar until just combined.
  • Add vanilla
  • Turn mixer onto low speed and add sifted flour and salt to the butter mixture. Mix until dough starts to come together.
  • Dump onto floured surface and shape into a flat disk.
  • Press dough into tart pan, making sure the edges are flat.
  • Chill until firm. Butter one side of a square of parchment paper that will fit into tart shell and place it, buttered side down, on the chilled pastry. Fill with rice, beans or pie weights.
  • Bake for 20 minutes. Remove the parchment and weights, prick tart all over with tines of a fork. Bake for 20-25 minutes more, or until lightly browned. Allow to cool at room temperature.
Pastry Cream
adapted from Barefoot Contessa Cookbook
make 2 1/2 cups

6 extra large egg yolks
3/4 c. sugar
3 T. cornstarch
2 cups whole milk
2 T. unsalted butter
1 t. vanilla extract
2 T. heavy cream
1 t. Bacardi golden rum
  • Combine sugar and cornstarch in bowl of electric mixer and rub them together using your hands.
  • Add egg yolks and beat using paddle attachment, until mixture is pale yellow and falls back into the bowl in a ribbon.
  • Bring milk to a boil in a large saucepan and , with the mixer on low, slowly pour it into the egg mixture. Then pour mixture back into the saucepan.
  • Cook over medium heat, stirring constantly with a whisk or wooden spoon, until mixture is thick, bringing mixture slowly to a boil.
  • Once mixture is to a boil, cook for 2-3 minutes longer.
  • Remove from heat and mix in butter, vanilla, cream and rum.
  • Strain into storage container. Place plastic wrap directly on top of the pastry cream and refrigerate until cold.
Assembly
  • Fill tart shell with pastry cream.
  • Add seasonal fruit.
  • Brush with glaze. (Melted Apricot or Currant Jelly thinned out with hot tap water)

Friday, July 10, 2009

Cool It Now: Strawberry Pops

My sister and I were Popsicle kids when we were growing up. I remember sitting in the shade during the hot Texas summer pushing our pop-ices up from their plastic casings with such refreshing enjoyment. We'd end up sucking the leftover juice out of the packaging because they seemed to melt within seconds of hitting our hands. If you were inventive, you'd blow air into the casing much like a balloon, throw your head back and allow the sweet juice to trickle into your mouth and down your throat.

We were such frozen treat connoisseurs and enjoyed all different kinds. We considered the creamsicles a very special treat. My favorite was the orange flavor. It was especially exciting when my mom filled dixie cups with juice and we'd chomp on homemade ice pops. And when the ice cream truck pulled in front of our house I opted for a berry cream popsicle in the shape of a foot that sported an embedded bubblegum toenail.

These Strawberry Pops may not be cream filled or may not even have a bubblegum toenail, but it is perfect for any kid...or any kid at heart.

Strawberry Pops
fills 8-3oz. molds

1 1/2 pint of strawberries
1/2 c. confectioner's sugar
1/3 c. water
  1. Pulse the strawberries, confectioners sugar and water in a food processor until pureed but still has some chunks remaining. Pour half of the mixture in a bowl.
  2. Puree remaining mixture until smooth. Add to bowl and stir the two mixtures together. Pour into popsicle molds or paper cups. Freeze until solid (8 hours.)
Have any remaining strawberry mixture...then you've got to do this:Pour it over ice cream...SO GOOD!!!

Wednesday, July 1, 2009

Oven Roasted BBQ Ribs

What is a summer BBQ without ribs? Ribs are a staple that you will find at just about any sweltering hot outdoor Texan barbecue and boy, do I have the recipe for you! Soaking them overnight in liquid smoke really gives them a backyard taste even though you've baked them in the oven. If you can't stand the heat...get into the kitchen and bake these ribs!

Patience is the key to these sweet and spicy ribs. The process will take you three days...yes, three days. The first two days are minor quick steps in preparation that will lead you to the final day of roasting low and slow.

The result: sweet, spicy and succulent ribs.

Ingredients
2 lb. rack of baby back ribs
1/2 c. of liquid smoke, separated
1 T. cumin seeds, toasted
2 T. ancho chili powder
1 t. cayenne pepper
2 t. sweet Hungarian paprika
2 T. brown sugar
1 T. granulated sugar
3 garlic cloves, peeled and smashed
1/2 c. spicy barbecue sauce
Dash of Worcestershire Sauce
1/2 t. Old Bay seasoning
1/4 c. beer

Day One:
Soak Ribs in 1/2 c. minus 1 tablespoon of liquid smoke, reserve the Tablespoon of Liquid Smoke. Wrap in plastic wrap or use a gallon bag and soak over night.

Day Two:
Make the dry rub. Add cumin, ancho chili powder, cayenne, paprika, sugars and garlic cloves to a food processor or mortar and grind to a paste. Rub on both sides of ribs, wrap in plastic and refrigerate overnight.

Day Three:
Preheat oven to 215 degrees. Place ribs uncovered in a baking dish. Bake for three hours. Remove from oven and mix BBQ sauce, reserved liquid smoke, Worcestershire sauce and Old Bay and spread on top of the ribs. Add the beer to the bottom of the pan and bake 45 minutes longer.

Sunday, June 14, 2009

Orange Date Bread


Have you ever bought an ingredient without having a plan or purpose to use it right away. You know, that product that pops out from the aisle and begs you to purchase it. That is what happened to me several weeks ago. For some reason I was drawn to the dried fruit section and bought not one, not two, not even three but four bags of dried fruit.

Of course I used the cranberries right away and gobbled up the apricots and prunes. But there it was sitting on the pantry shelf neglected for weeks...dates. Oh what to do, what to do??? Finally, Ina Garten had an idea (and it didn't involve chicken!) Date Nut Bread!

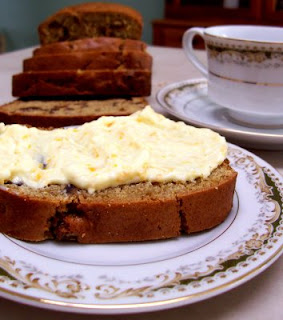
I made it for my mom, aunt and grandmother and they all loved it. I topped each slice with the cream cheese spread from my previous post. It would be a great gift bread for the holidays. It is chewy, moist and just plain good.

Orange Date Bread
adapted from Ina Garten 1 loaf
1 (80z). bag of dates, chopped
1/3 c. orange juice, freshly squeezed
4 T. unsalted butter
3/4 c. light brown sugar
1 egg
1 t. vanilla
Zest of 2 Navel Oranges
2 c. AP flour
2 t. baking powder
1/2 baking soda
1 t. cinnamon
1 t. nutmeg
1/4 t. ground cloves
1 t. salt
3/4 c. orange juice, freshly squeezed (used from zested oranges)
1 (2 oz.) bag of pecan pieces
  • Butter, flour and line a loaf pan with parchment. Set oven to 350 degrees
  • Combine dates and 1/3c. orange juice in bowl and set aside for 30 minutes. Toss occasionally.
  • Cream butter and brown sugar on medium speed. Add egg, vanilla and orange zest and mix on low speed until combined.
  • Sift flour, baking powder, baking soda, cinnamon, nutmeg, ground cloves and salt.
  • With mixer on low, add flour mixture alternately with the orange juice, beating until just combined.
  • Stir in dates with liquid and pecans.
  • Pour into a loaf pan and smooth out top. Bake for 50-60 minutes
Serve with Orange Cream Cheese Spread

Sunday, June 7, 2009

An Interview With My Blogger Mommy

I've always had a great passion for food. I love the warm, sweet and inviting smell of melting chocolate. I loved noshing on holiday confections my grandmother delicately created. And it just doesn't seem like Christmas if our table is not graced with a dinner of ham, chicken and dumplin's (yes, I said dumplin'), black eye peas and pea salad. I enjoy talking about food just as much as eating it, hence the B-4-B blog, an outlet for this stay-at-home-mom to express her inner-foodie.

I was quite fortunate to come across the Adopt A Blogger Event via Dine & Dish. Wow, there are so many people out there passionate about food and what a great tool to share and learn from one another. Being that my food blog has been running for 6 months, I was considered a "newbie" and was matched with Bunny from Bunny's Warm Oven. Bunny, my blogger mommy had adopted me and how lucky am I!

She has a beautiful blog, delectable recipes and a shared passion of baking. I know I'll learn a lot from her. If you've never visited her blog, I urge you to do so.
Please enjoy the following interview featuring Bunny! Do any of you share common interests?

Do you have a favorite cookbook?
As a matter of fact I just bought 2 new cookbooks this week....Martha's Cookies and Martha's Cupcakes. I love both of these cookbooks!! I've seen so many wonderful recipes in them that it just makes me want to run to the kitchen and bake!!
What would people be surprised to find in your kitchen?
Boy this is a hard one, I have a measuring tape in my kitchen gadget drawer. I swiped from my hubby! I am seriously measurement impaired! If a recipe says something has to be this long and this wide I have to measure it, eyeballing something just doesn't work for me.
Name three things you always have on hand in your refrigerator or pantry.
There are three things that you will always find in my fridge...cream cheese, I wait till it goes on sale at 10 pkgs for 10.00 and stock up. Butter is a must, and sour cream would be the third. With these three items in the fridge I'm good to go for baking!
Do you have a favorite comfort food?
My favorite comfort food would be anything made with cinnamon and apples. I love the combination, just the wonderful aroma coming from the oven is comfort to me.
Where would your ultimate culinary destination be?
Believe it or not my ultimate culinary destination would be right here in the good ole US. I would head south, I LOVE southern food!! The biscuits the cobblers, cakes .....mmmmmm!!! I would love to sit at the hand of a southern baker and learn everything about southern cooking and baking.
What are you having for dinner tonight?
Because I have to be into work at 2pm today I'm making Ham and Green Beans in the crockpot so it'll be waiting for the kids and Sam when they're ready to eat. It's one of those meals they really like having. During the summer when the kids have no schedule to keep and Sam and I are working the crockpot is my best friend!
What is your favorite thing about blogging.
Sharing great recipes with people who are as excited about baking as I am! The whole reason for my blog was to share recipes and learn. I have learned so much about baking through other bloggers. The blogging community is wonderful group of people. The friendships I've formed are priceless to me. I look forward to sharing, learning and making new friends for the years to come.

Here is a tasty tease of a recipe using one of Bunny's staples, cream cheese. I'll post the bread early next week, so come back by and visit!


Cream Cheese Spread
adapted from Ina Garten

6 oz. whipped cream cheese

1/3 c. sugar
Zest of 2 oranges
  1. Combine all ingredients until just combined.
  2. Spread on Orange Date Bread (recipe featured next week)

Monday, June 1, 2009

Lime Pie with Gingersnap Crust


Pies are much like their makers-each have their own personality. One can be sweet and simple or rich and decadent. Others can be spicy and good or just plain ol' nutty.

Lime pie with gingersnap crust welcomes summer with it's bright, fresh and tangy filling. The crust will have you yearning for an early change of season with its warm autumnal spiciness. The recipe itself is simple, quick and can be made ahead and stored in the refrigerator. Eat it plain or serve it with sweetened whipped cream.

Bright and fresh, warm and inviting, the two create a flavor combination (or personality) as unique as any.

Lime Pie with Gingersnap Crust

Crust
1 1/2 c. gingersnap cookies crumbs
1/2 T. sugar
4 T. unsalted butter, melted

Filling
1/2 c. lime juice
1 can (14 oz.) sweetened condensed milk
2 egg yolks
  1. Preheat oven to 325F
  2. Combine cookie crumbs and sugar in a medium bowl. Add melted butter and combine until mixture resembles coarse sand or can hold its shape when squeezed together.
  3. Press evenly into a glass pie plate and bake for 10 minutes. Allow to cool on rack. Increase oven temperature to 350F.
  4. Meanwhile, mix lime juice, condensed milk and egg yolks until smooth.
  5. Pour into cooled pie crust. Bake for 15 minutes. Allow to cool on rack.
  6. Transfer to a refrigerator and chill for at least 4 hours or overnight.

Friday, May 22, 2009

Whey Cool! Making Ricotta Cheese

I can now officially check an item off of my bucket list. I am an artisan cheesemaker. Only in my own home, that is. Years ago I read an article on making yogurt cheese. I was quite intrigued yet never got around to making it. Earlier this year I came across an article in Bon Appetit featuring fresh ricotta. I urged myself to try it.

I felt like a mad scientist watching the curds separate from the whey. The process was surprisingly simple and yet so satisfying. You only need three ingredients and 15 minutes out of your day to create this creamy, sweet ricotta.

Fresh ricotta is moist, light and addictive. The texture and taste reminded me of farmers cheese. If you've never had fresh ricotta you're in for a real treat. Slather it on bruschetta, toss it in a pasta or add it into a dessert.


Fresh Ricotta
source: Bon Appetit January 2009
  • 8 cups whole milk
  • 1 teaspoon salt
  • 3 tablespoons fresh lemon juice
  1. Line colander with 4 layers of cheesecloth; set in sink.

  2. Bring milk and salt to simmer in heavy large saucepan over medium-high heat. Stir in lemon juice. Let simmer until curds form, 1 to 2 minutes.

  3. Using finely slotted spoon, scoop curds from pan and transfer to cheesecloth-lined colander. Let drain 1 minute (curds will still be a little wet). Transfer curds to a bowl. Cover and chill until cold, about 3 hours.

Make in advance! Can be made 2 days ahead. Keep chilled.

Friday, May 8, 2009

Strawberry Cupcakes

It was a cold Idaho winters day and I was a prisoner in my own home. Bound to the couch, I had such terrible, debilitating morning sickness that lasted twelve hours a day for several months. Somehow I had only survived on water, chicken noodle soup, Teddy Grahams and pasta and the thought of anything else sent my stomach into a downward (or upward??) spiral.

Snuggled underneath my blanket I began to watch Cupcake Week on The Martha Stewart Show. I suppose I was living vicariously through others as I had not baked for months. Once I saw these Strawberry Cupcakes made by the delectable Sprinkles Bakery, I instinctively made a mental note to bake them in the near future.
One year later I found myself baking these cupcakes in my kitchen while my baby boy sat in the living room playing with his Daddy. I instantly thought back to where I first encountered this recipe and started to smile. I remember feeling eager, excited, frightened of the unknown, generally terrified and happy all at once. How amazing was it that such a new venture in life could stem all of those feelings. I am happy to share a recipe that created such a memory and reminds me of the early stages of becoming a mother. With that said, this recipe is dedicated to all mothers and mothers-to-be. Happy Mothers Day.


Strawberry Cupcakes
Source: Sprinkles Bakery recipe featured on Martha Stewart

Makes 1 dozen

  • 1/2 pound strawberries
  • 1 1/2 cups all-purpose flour, sifted
  • 1 teaspoon baking powder
  • 1/4 teaspoon coarse salt
  • 1/4 cup whole milk, room temperature
  • 1 teaspoon pure vanilla extract
  • 1/2 cup (1 stick) unsalted butter, room temperature
  • 1 cup sugar
  • 1 large egg, room temperature
  • 2 large egg whites, room temperature
  1. Preheat oven to 350 degrees. Line a 12-cup muffin tin with cupcake liners; set aside.
  2. Place strawberries in a small food processor; process until pureed. This should be enough for both cake and frosting. If not you can always puree some more.
  3. In a medium bowl, whisk together flour, baking powder, and salt; set aside. In a small bowl, mix together milk, vanilla, and 1/3 cup strawberry puree; set aside.
  4. In the bowl of an electric mixer fitted with the paddle attachment, cream butter on medium-high speed, until light and fluffy. Gradually add sugar and continue to beat until well combined and fluffy. Reduce the mixer speed to medium and slowly add egg and egg whites until just blended.
  5. With the mixer on low, slowly add half the flour mixture; mix until just blended. Add the milk mixture; mix until just blended. Slowly add remaining flour mixture, scraping down sides of the bowl with a spatula, as necessary, until just blended.
  6. Divide batter evenly among prepared muffin cups. Transfer muffin tin to oven and bake until tops are just dry to the touch, 22 to 25 minutes. Transfer muffin tin to a wire rack and let cupcakes cool completely in tin before icing.
Strawberry Frosting

Makes enough for 1 dozen cupcakes

  • 3 T. strawberry puree from above
  • 1 cup (2 sticks) unsalted butter, firm and slightly cold
  • Pinch of coarse salt
  • 3 1/2 cups confectioners' sugar, sifted
  • 1/2 teaspoon pure vanilla extract
  1. In the bowl of an electric mixer fitted with the paddle attachment, beat together butter and salt on medium speed until light and fluffy. Reduce mixer speed and slowly add confectioners' sugar; beat until well combined. Add vanilla and strawberry puree (save any remaining strawberry puree for another use); mix until just blended.