Showing posts with label Breads. Show all posts

Wednesday, August 13, 2014

my summer love (recipe: zucchini bread)

I love when I find a recipe and fall completely in love with it.  This is how I feel about the Zucchini Bread from this summer's issue of Cook's Illustrated.  It is light, moist, springy and delectably delicious.  I've made it several times this summer, taking advantage of summer's bounty.  It has been my dessert, a butter slathered afternoon snack, an accompaniment to my morning tea, and may or may not have met my lips in the midnight hour.  I hope you find yourself making this lovely loaf before summer ends and maybe it will become your Summer Love as well.

Zucchini Bread
yield:  one loaf

1 1/2 pounds zucchini, shredded
1 1/4 cups packed brown sugar
1/4 cup vegetable oil
2 large eggs
1 tsp. vanilla extract
1 1/2 cups all-purpose flour
1/2 cup whole-wheat flour
1 tablespoon ground cinnamon
1 1/2 teaspoons salt
1 teaspoon baking powder
1 teaspoon baking soda
1/2 teaspoon ground nutmeg
3/4 cup pecans, toasted and chopped
1 tablespoon granulated sugar
  1. Adjust oven rack to middle position and heat oven to 325 degrees.  Grease 8 1/2 by 4 1/2-inch loaf pan.
  2. Place zucchini in center of dish towel or layered cheese cloth.  Gather ends together and twist tightly to drain as much liquid as possible discarding liquid .  Whisk brown sugar, oil eggs, and vanilla together in medium bowl.  Fold in zucchini.
  3. Whisk flours, cinnamon, salt, baking powder, baking soda, and nutmeg together in large bowl.  Fold in zucchini mixture until just incorporated.  Fold in pecans, if using.  Pour batter into prepared pan and sprinkle with granulated sugar.
  4. Bake until top bounces back when gently pressed and toothpick inserted in center comes out with a few moist crumbs attached, 65 to 75 minutes.  Let bread cool in pan on wire rack for 30 minutes.  Remove bread from pan and let cool completely on wire rack.  Serve.
source:  Cook's Illustrated No. 129

Friday, June 13, 2014

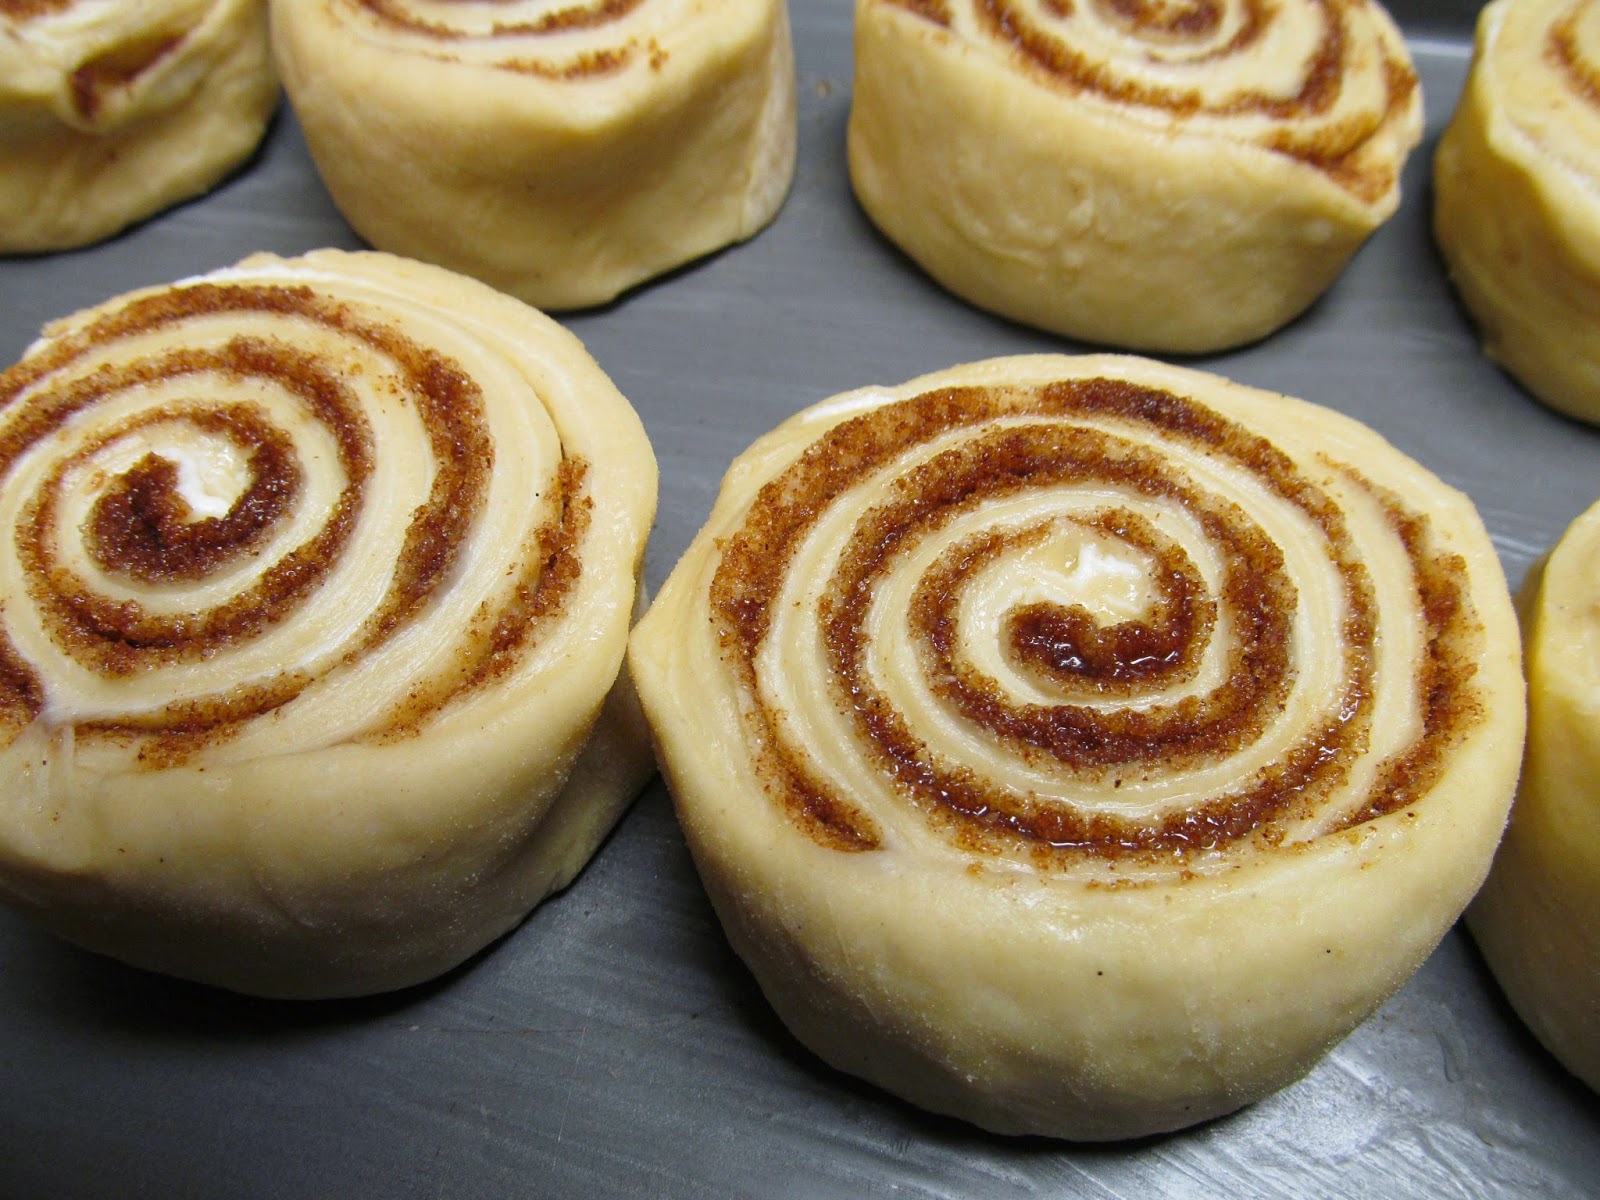
before I was mom I was baker (recipe: cream cheese cinnamon rolls)

Before I became a mom I was a baker.  My alarm was set for 3:17 am every morning.  I'd roll out of bed, brush my teeth, slip on my chef pants and throw on a thread bare tee-shirt.  The thinner the shirt the better-if you can't stand the heat, wear breathable cotton.

I'd drive a few exits north, snow usually dancing on my windshield-it was Idaho after all and during long winters it wasn't abnormal to see snow during six of the twelve months.  During fire season the Bannock Range would glow from the small fires set by lightning strikes.  Those summer mornings were always different, lonelier and a little sinister with fire breathing down the hills.

Our crew would fall in one by one and begin making dough-a delicious homey white, a molasses spiked wheat, a dense french.  We'd mix, scale, cut, shape, proof and bake.  We'd make cookies, brownies and slab apple pie.  When you had proved yourself responsible, worthy and skilled you were given the opportunity to make the infamous cinnamon rolls our bakery was known for.

I began making cinnamon rolls only a few months after I began working at the bakery.  The first day I rolled out the dough, spread the cinnamon "schmear" onto the surface, rolled it up into a tight jellie roll and sliced them into perfect, uniform, spiraled buns just as I had learned years before in culinary school.  They were so beautiful.

As I laid them out onto the baking sheet the lead from the front of the house passed by, gazed at my cinnamon rolls and gasped.  I panicked a bit and asked what was wrong.  "Do we not make cinnamon rolls anymore?" she asked.  I pointed out my trays and explained that I had just shaped them.  "But they look like a machine made them, I was afraid for a moment that we were selling boxed cinnamon rolls from the freezer!"  I assured her that it was the exact recipe that had been used for over a decade, they just had a new baker in the kitchen.

When I make cinnamon rolls at home I still practice the techniques I learned from my chef instructor years ago, taking care of their uniformity, delicately forming that perfect cinnamon spiced spiral that twirls about the bread.  They are such beauties.

This recipe from Saveur incorporates cream cheese into the dough which adds a delicate tang, a certain richness, enhances moistness and mellows the filling.  The recipe is a labor of love and would be a perfect addition for a family breakfast, special occasion or holiday gift.  You can also make the rolls in advance and refrigerate them overnight-which is a great time saver when entertaining.  Tender.  Delectable.  Scrumptious.  You've got to give them a whirl.

Cream Cheese Cinnamon Rolls

source:  Saveur, Issue 114


FOR THE DOUGH:
1 (¼-oz.) package active dry yeast
½ tsp. plus ¼ cup sugar
½ cup milk, at room temperature
2 tbsp. light brown sugar
½ tsp. vanilla extract
1 egg
1 egg yolk
2¾ cups flour, sifted, plus more for kneading
¾ tsp. fine salt
8 tbsp. unsalted butter, at room temperature, plus more for the pan

FOR THE FILLING:
½ cup sugar
¼ cup dark brown sugar
1 tbsp. ground cinnamon
½ tsp. fine salt
⅛ tsp. ground cloves
2 tbsp. maple syrup
4 oz. cream cheese, at room temperature
8 tbsp. unsalted butter, melted

FOR THE ICING:
2 cups confectioners' sugar
¼ cup buttermilk

1. Make the dough: In the bowl of a standing mixer fitted with a hook, combine yeast, ½ tsp. of the sugar, and ¼ cup water heated to 110°. Stir to combine and let sit until foamy, about 5-10 minutes.

2. Add remaining sugar, milk, light brown sugar, vanilla, egg, and egg yolk. Beat on low speed until thoroughly combined, 1 minute.

3. Turn mixer off and add the flour and salt. Mix on medium speed until the dough just comes together. Turn mixer speed to high and knead dough for 4 minutes. Add the butter and continue kneading until dough is smooth and pulls away from the side of the bowl, about 6 minutes. Remove bowl from the mixer, cover with plastic wrap, and set aside in a warm place. Let the dough rise for 1 ½–2 hours, until it has doubled in size.
4.  Make the filling: Combine the sugar, dark brown sugar, cinnamon, salt, and cloves in a large bowl; stir to combine. Stir in the maple syrup. Set filling aside.

5. Punch the dough down and turn it out onto a heavily floured surface. Gently knead the dough until it's no longer sticky, adding more flour as necessary, about 1 minute. Using a floured rolling pin, roll the dough into a 10" x 10" square. In a small bowl, beat the cream cheese with a rubber spatula until it's smooth and spreadable. Spread the cream cheese evenly over the dough square; then fold square into thirds as you would fold a letter to fit it into an envelope. Take the open ends of the resulting rectangle and fold into thirds again, to make a smaller dough square. Invert the dough so that the seam is face down and, using the rolling pin, gently roll into a 10" x 20" rectangle.

6. Turn the dough so that the short sides are parallel to you. Brush the top of the dough with half of the melted butter. Drizzle the reserved filling over the dough, leaving a 1" border at the edge farthest away from you. Lightly press the filling into the dough. Using your hands, lift up the bottom edge of the dough and roll it forward into a tight cylinder. Place dough cylinder, seam side down, on a cutting board and, using a thin, sharp knife, trim off the ends; cut cylinder crosswise into 8 equal-size slices. Nestle the slices, cut sides up and evenly spaced from one another, into a buttered 9" x 13" light-colored metal baking pan. Cover pan with plastic wrap and set aside in a warm place to let rise for 2 hours. (Alternatively, the rolls may be refrigerated overnight.)

7. Heat oven to 375°. Uncover the rolls. (If refrigerated, let them sit at room temperature for 15 minutes.) Bake until golden brown and a toothpick inserted in the center of the rolls comes out clean, about 30 minutes.

8. Make the icing: While the rolls are baking, whisk together the sugar and buttermilk in a small bowl until smooth.

9. Transfer the pan of cinnamon rolls to a cooling rack; brush with remaining melted butter. Let cool for 5 minutes. Dip the tines of a fork into the icing and drizzle all over the rolls. Serve immediately.

Friday, January 17, 2014

olive oil herb bread

I love when neighbors share gifts from their gardens.  A simple afternoon stroll can grant you with a glorious and unexpected bounty.  During early summer, when my husband and I would walk through our neighborhood in Idaho, we'd find boxes of stone fruit along the curbside with the word "Free" scribbled on the box flaps.  We'd load up a haul and enjoy our neighborhood summer fruit during the rest of the week.

In our current neighborhood, I've been gifted plums and pears, tomatoes and herbs.  Neighbors here aren't as old school as my Idaho neighbors.  You won't find as many boxes along the roadside, but an alert on Facebook inviting neighbors to pick up garden produce from their front porch isn't uncommon.  Only once have I encountered a box sitting curbside here in this neighborhood; it was filled to the brim with rosemary.  I picked up a few bundles, plucked some thyme from my garden and returned to my kitchen to make olive oil herb bread.

Olive oil herb bread has an earthiness that I find pairs well with pastas, hearty soups, stews, and rich winter sauces.  It can be enjoyed with a simple swiping of butter or grilled and topped with a tomatoey bolognese sauce.  And because this recipe makes two loaves, my family enjoyed one and my neighbor with the abundance of rosemary received the second loaf.

Olive Oil Herb Bread
yield:  two loaves

1 1/2 teaspoons active dry yeast
1/4 cup warm water
5 Tablespoons extra virgin olive oil
1 teaspoon sugar, plus a pinch for yeast activation
1 teaspoon salt
1 tablespoon chopped fresh rosemary
1 tablespoon chopped fresh thyme
1 1/2 cups all purpose flour (AP), plus more for dusting
1 cup whole wheat flour
  1. Combine yeast, the warm water and a pinch of sugar in the bowl of an electric mixture.  Allow it to stand for 5 minutes until it is nice and foamy.
  2. Add olive oil, 3/4 cup water, sugar, rosemary, thyme, whole wheat flour, AP flour, and salt to the bowl.  Attach the dough hook to the machine and mix on low until the dough comes together, about one minute.  Increase the speed to medium high and mix until the dough is smooth and elastic, about 8 minutes.
  3. Lightly oil a bowl and form the dough into a ball.  Place ball of dough top side down into the oiled bowl to moisten the top of the dough.  Flip over to bottom side down.  Cover lightly with plastic wrap, let dough rise in a warm, draft-free area until it doubles in bulk.  About one hour.
  4. Punch down dough and let it rest for 15 minutes.  Turn dough out onto a lightly floured surface and divide it into two equal portions.
  5. Shape one portion of the dough by flattening it into a 7 inch long rectangle (long ways going left to right).  Roll the side nearest you up toward the farthest end.  Place dough, seam side down, and roll it to elongate to 11 inches and seal the seam to make a free form loaf.  Place on a parchment lined baking sheet.  Repeat with other portion of dough.
  6. Loosely cover the loaves with plastic wrap and let rise in a warm, draft-free area for 30 minutes.  Preheat oven to 400 degrees F.
  7. Dust loaves with flour and bake until golden, around 30 minutes.  Let cool on wire rack before slicing.

Friday, August 16, 2013

i have plans for you (recipe: crispy garlic bread)

Do you remember that super scrumptious baked manicotti with meat sauce I posted a few months back?  If you don't, I urge you to go take a peek at the recipe.  And then after that, write your grocery list accordingly.  And after you purchase all of the ingredients for baked manicotti invite some friends over for dinner Italiano.  And on the day of your dinner party prepare and bake the dish according to the instructions provided.  Remember to make this crispy garlic bread.  Maybe make sauteed broccoli rabe w/ sliced garlic and crushed red pepper.  Pour some wine.  Enjoy the creamy filling of the pasta and the absolute, divine, robust, flavor of the homemade meat sauce; enjoy the crunch of the bread.  Enjoy the wine.  Enjoy being amongst friends.

Crispy Garlic Bread
makes 12 slices

12 tablespoons (1 1/2 sticks) unsalted butter, softened
4 garlic cloves, grated or minced
1/4 teaspoon sugar
1/4 teaspoon salt
1/4 teaspoon pepper
12 (1-inch) slices Italian bread
  1. Make Paste:  Adjust oven rack to middle position, place rimmed  baking sheet on rack, and heat oven to 425 degrees F.  Using fork , beat butter, garlic, sugar, salt, and pepper in a small bowl until combined.  Spread butter mixture evenly over both sides of bread.
  2. Toast Bread:  Arrange buttered bread on heated baking sheet and bake until golden brown on first side, 8-10 minutes.  Flip and bake until golden brown on second side, about 5 minutes.  Serve.

Wednesday, April 17, 2013

the favorite eating spot (recipe: Cashew Chicken Ranch Pizza)


My husband and I have always had our favorite eating spots.  You know the ones, small, dark, maybe a little dingy, never crowded but oh. so. good.  In college it was a tiny house on the east side of Nacogdoches called Aubrey's.  They cooked like any treasured southern grandma, served heaping portions to starving college students for a price of next-to-nothing.  Sundays were smothered chicken and dressing, Fridays they served beef tips and rice, Wednesday was chicken and dumplin's (yes, dumplin's).  It's been 14 years ago since I sat at their table and I still remember their specials.


In College Station, well, there were so many favorites.  Hot Dogs Etc. is a tiny, spotless restaurant at the wrong end of Bryan-they serve the best chili dog ever.  Pepe's always looked dirty and dingy but for poor college kids it was the answer to homemade fast Mexican food served in a Taco Bell atmosphere.  Their salsa though, I could drink a vat of it.  Hebert's Cajun Food was our ultimate favorite.  They served their spicy fare from a small drive-thru kiosk.  My husband picked up jambalaya so often they knew his name and exactly what he was going to order.  It is THE best jambalaya the pair of us had ever tasted.


When we moved to Pocatello, well, the food scene was quite bleak.  Almost terrible.  But we found a few diamonds in the rough.  Breakfast or morning sickness curing comfort could be found at Butterburr's. Taqueria La Costa gave these displaced Texans a taste of home, and Dough Boyz served our all time favorite slice of pizza-Cashew Chicken Ranch.

Since those days in that desert mountain town, Dough Boyz closed it's doors and we made the move back to Texas.  And every once in a while we recreate our favorite pizza at home and think of the red booth seats and snowy sidewalks that lined that pizzeria.

Cashew Chicken Ranch Pizza
serves 4-6

12 oz. or 1/2 recipe of Quick Beer Pizza Dough
Bottled Ranch Dressing
1/2 cup Cashews
3/4 cup  cooked chicken, cubed (*great way to use leftovers)
12 oz. Mozzarella, shredded
  1. Preheat oven to 425 degrees F.  Flatten dough into a 10" round on a pizza stone or baking sheet.  Par-bake the dough for five minutes and remove from the oven.
  2. Spread a thin layer of ranch dressing evenly over the par-baked pizza crust.
  3. Place cashews and chicken evenly on top of the ranch covered pizza and cover with cheese.
  4. Bake for 10 minutes or until cheese has bubbled and melted.
  5. Cool for 5 minutes, slice and enjoy.

Wednesday, April 3, 2013

banana bread with pecans and golden flaxseed

There are not many rainy days that have found themselves in Central Texas lately and definitely not many that decide to linger but April has held true to her reputation this week by bringing us plenty of springtime showers.  Today was a cool and wet one; gentle tapping of steady rainfall, birds reveling in the chilly shower and rumbles of thunder in the distance.  It was a perfect day to bake-and so I did.

I still consider myself to be a wholesome bee and do not find myself indulging as much as I used to. Baking has been scarce this year but rainy days make for great exceptions.  As I paced across my kitchen this morning my eyes fell upon two very ripe bananas begging to be a part of something wonderful.

Banana Nut Bread with a wholesome twist.  Nuts and a healthy helping of ground flax seed give this banana bread varied texture.  Flax seed is prized for its many vitamins and minerals, omega-3 fatty acids, and is also rich in fiber.  A slice of this bread with a cup of tea would be perfect to begin your day or snack on as you watch the leaves and flowers dance in the rain.

Banana Bread with Pecan and Golden Flaxseed
Makes 1 Loaf:  8 servings

2 T unsalted butter, melted, plus more (softened) for pan
1/2 cup whole-wheat flour
3/4 cup all purpose flour
1/4 cup golden flaxseed (ground from 2 heaping tablespoons whole)
3/4 teaspoon salt
1/2 teaspoon baking powder
1/2 teaspoon baking soda
1 large egg, plus one egg white
1/2 cup light brown sugar
1 1/2 teaspoons vanilla bean paste (or equal amount vanilla extract)
2 very ripe bananas, mashed
1/2 cup pecans, toasted and chopped
  1. Preheat oven to 350 degrees F.  Grease 9-by-5-by 3 inch loaf pan with butter, set aside.  Whisk whole wheat flour, AP flour, salt, flax, baking powder, and baking soda in a medium bowl, set aside.
  2. Put egg and egg white into a bowl of an electric mixture.  Mix on low until well combined, two minutes.  Add sugar, vanilla, bananas, melted butter, and mix until combined.  Add flour mixture, and mix on low speed until batter forms.  Stir in pecans.
  3. Pour batter into pan and bake for 35 minutes  or until a cake tester inserted into center comes out clean.  Slightly cool on a wire rack.  Remove bread from pan and cool completely on rack.

Monday, February 20, 2012

Fat Tuesday Celebration: King Cake


We have roughly nine hours until Fat Tuesday (English translation for Mardi Gras), referring to the practice of indulging in rich, fatty, delicious foods before the Lenten season begins.  I have friends talking of gumbo, andouille sausage, boudin and King Cake.  Many of my friends order their King Cake-but I make my own.  After years of making cinnamon rolls at bakeries & restaurants-its something I think I can handle, because a King Cake is essentially a ginormous cinnamon bun!

The King Cake, traditionally served on Kings Day (January 6), though most popular during Mardi Gras, is a brioche type bread swirled with cinnamon, braided and formed into a ring.  It is topped with icing and colored sprinkles, gold (for power), green (for faith) and purple (for justice).

A small trinket is usually hidden inside the cake, usually a plastic baby representing baby Jesus or a golden coin.  Traditionally, the person that finds the trinket either throws next year's Mardi Gras party or buys the next King Cake.  At some parties, the person with the trinket in their slice of cake is crowned king or queen of the party.  Maybe I'll find that trinket...it wouldn't hurt being Queen for the day, right?


King Cake
yield:  1 cake

4 3/4 all purpose flour
1/4 cup sugar
1 1/2 teaspoons salt
2 packages Active Dry Yeast
3/4 cup milk
1/2 cup water
1 stick butter
2 eggs
  1. In a large bowl, combine 1 1/2 cups flour, sugar, and packaged yeast.  Heat milk, water, and butter until very warm, about 120-130 degrees F.  Add to dry ingredients and beat for 2 minutes and medium speed with an electric mixer.  Add eggs and 1/2 cup flour.
  2. Beat on high speed for 2 minutes.  Stir in remaining flour (2 3/4 cups) to make a stiff batter.  Cover tightly with plastic wrap and refrigerate for 2 to 3 hours.
  3. Punch dough down.  Move dough to a lightly floured surface and divide into equal portions.  Roll each to 28x4 inches.
  4. Prepare filling (below).  Brush each piece of dough with melted butter and sprinkle evenly with the cinnamon & sugar mixture.
  5. Beginning and the long end, roll each piece up tightly as you would for a cinnamon roll or jelly roll.
  6. Pinch seams to form long ropes.  Braid, then form into an oval.  Pinch ends to seal.  Place on a parchment lined baking sheet.  Cover and let rise in a warm, draft free place until doubled in size, about an hour.
  7. Bake at 375 degrees F, 25-30 minutes or until lightly golden.  Remove from baking sheet and cool on a wire rack.  Drizzle glaze over the cooled cake and sprinkle with colored sugars.
Filling
1/2 stick butter, melted (for brushing)
3/4 cup sugar
1 tablespoon cinnamon
  1.  Combine sugar and cinnamon, set melted butter aside.
Glaze
2 cups powdered sugar, sifted
2-3 tablespoon milk
  1. Whisk until smooth

Monday, January 23, 2012

Birds Outside My Window (Recipe: Brown Sugar Oatmeal Pancakes)

Winter's Solitude
"La-Di-Da-Da-Dah, birds outside my window," is the little melody I hear my son sing every morning the birds feed from the birdhouse hanging from the backyard tree.  I can't keep up with their appetites and I'm afraid they are beginning to peck a hole in my pocket book.
Abandoned Homes
The winter birds are more pleasant that the grackles that monopolize the trees during the summer.  I can see three abandoned grackle nests from a second story window and really don't feel myself missing their absence.  The past weeks have brought us loads of house sparrows, a few finches, an occasional turtle dove, a few blue jays and cardinals.  I wish more blue jays would visit, they are my favorite.
Camouflaged:  Can you find the two birds in the left frame and the three in the right frame?

Baking Tot had put in a request for pancakes one morning and being that I hadn't made pancakes in a while thought it was a brilliant idea.  I wanted to try something other than our usual buttermilk or whole wheat pancakes and came across a recipe for Brown Sugar Oatmeal Pancakes.  They are perfect for the colder months. The oatmeal lends a hardiness that isn't found in our usual pancakes and the brown sugar adds a hint of caramel flavoring.  It would be a great additional to your breakfast repertoire, as it is a quick recipe to whip up and the batter can be made in advance.
Brown Sugar Oatmeal Pancakes

Brown Sugar Oatmeal Pancakes
***need some batter advice:  go here for the key to a light and fluffy pancake.
Yield:  about 10 pancakes

1/2 cup plus 2 tablespoons quick-cooking oats
1/2 cup whole wheat flour
1/2 cup all purpose flour
1/2 teaspoon baking soda
1/2 teaspoon salt
1/3 cup packed brown sugar
1 egg
2 tablespoons canola oil
1 cup buttermilk
  1. In a small bowl, combine the oats, flours, baking soda, salt and sugar.  In another bowl, beat the egg, oil and buttermilk.  Stir into dry ingredients just until moistened.
  2. Pour batter by 1/3 cupful onto a greased hot griddle.  Turn when bubbles form on top; cook until the second side is golden brown.

Monday, January 9, 2012

The color of winter (Recipe: WW Beer Bread)

Nature's Ornaments


Its hard to believe that Christmas has passed, we rang in the New Year and have said goodbye to the second week of January, all the while wearing shorts and tee-shirts down here in The Lone Star State.
Today has finally given us something that resembles winter-overcast skies, wind and a cool drizzling of rain.  The few handfuls of leaves still grasping to the pear tree won't last long now.  They have a story of fight and survival on their hands and thus must be strong.

Somebody is hungry
My husband and I took very good care of our trees during this past summer's painful drought.  We followed the restrictions but never missed a watering day-our trees can show for that.  Their colors are great, from the deepest purple, to the crimson reds that fade to oranges and yellows.  We must exercise patience here in Texas, as our changing of the leaves come during the winter months.  They are resilient.
They have a story to tell
I've been tinkering with my new toy, a camera the hubs surprised me with for Christmas.  I love it and am very pleased with it.  I have a lot to learn in order to get the quality I hope for.  The nature shots are with the new camera.  The picture of the rather healthy hawk stalking my parent's backyard was taken from the inside of the house and the zoom impressed me greatly.  Not a bad shot through a window pane on a rather foggy morning.  The bread pic is taken with my oldie but goodie (which is still held together by tape).

They last few just holding on
When the weather turns cold you can usually find our kitchen bubbling with a spicy gumbo.  We love beer bread paired with Cajun food.  It accompanies gumbo and seafood stews really well.  I think a thick slice slathered with butter is a perfect snack for a winter's day that is trying so hard to get here.

WW Beer Bread
Whole Wheat Beer Bread
1 loaf
1 1/2 c. all purpose flour
1 1/2 c. whole wheat flour
4 1/2 t. baking powder
1 1/2 t. salt
1/3 c. packed brown sugar
1 (12-fl. oz) bottle beer (we use Shiner-'cause its the law)
  1. Preheat oven to 350 degree F.  Lightly grease a 9x5-inch loaf pan.
  2. In a large mixing bowl, stir the flours, baking powder, and salt together.  Add brown sugar and mix the dry ingredients together.  Add the beer and stir until a stiff batter forms.  Scrape dough into prepared pan.
  3. Bake in preheated oven for 50-60 minutes or until a toothpick inserted in the center of the loaf comes out clean.

Monday, November 28, 2011

the best pumpkin chocolate chip bread ever!!!

It smells like the holidays in my house at this very moment.  The scent of cinnamon, pumpkin, a hint of ginger and chocolate wafts through the air as Pumpkin Chocolate Chip Bread cools on the counter.

I would like to think that Christmas has a scent.  It just doesn't smell like the holidays until I smell pumpkin, cinnamon or ginger.  When I was younger, the subtle burning smell of the heater lit for the first time was a gentle warning that Christmas would be near.  My mother's stove top potpourri, scented with citrus, cinnamon and clove was a warm welcome when returning home from school.  And long before my dad banned live Christmas trees from the house, the piney scent of our tree would launch excitement of presents to come and evenings with dimmed house lights and a magical, twinkling tree.  I love the smell of Christmas!

I wish everyone out there a wonderful and happy holiday season.

Pumpkin Chocolate Chip Bread
yield:  3-9x5 loaves

This bread is amazing.  It makes 2-3 loaves.  I have a larger loaf pan so I yield two.  This bread is moist and flavorful and so good that my husband basically ate a whole loaf in one day!  When I asked what he'd like for dinner this week, he replied, "(Pumpkin) Chocolate Chip Bread."  Freezer friendly too!

3 cups white sugar
1 can (15 oz.) can pumpkin puree
1 cup vegetable oil
2/3 cup water
4 eggs
3 1/2 cups AP flour
1/2 tablespoon ground cinnamon
1/2 tablespoon ground nutmeg
1/4 teaspoon ground all spice
1 teaspoon ginger
2 teaspoons baking soda
1 1/2 teaspoons salt
1 cup chocolate chips (I use a mix of milk & semi sweet)
  1. Preheat oven to 350 degrees F. Grease & flour three 9x5 loaf pans.
  2. In a large bowl, combine sugar, pumpkin, oil, water, and eggs.  Beat until smooth.  In a separate bowl, sift together flour, cinnamon, nutmeg, all spice, ginger, baking soda & salt.  Add dry ingredients to the sugar/pumpkin mixture.  Fold in chocolate chips.  Fill pans 3/4 full.
  3. Bake for 60-70 minutes, or until cake tester comes out clean.  Cool on wire racks before removing from pans.

Wednesday, November 16, 2011

A Must Share Recipe: Quick Beer Pizza Crust


I've come across many wonderful recipes from the blogging world.  I have my favorites, but this pizza is by far the current favorite and has been since August.  When Amber, from Bluebonnets & Brownies, posted this recipe I knew I had to try it.  She acquired it from the King Arthur Flour Co.'s blog and I'm so glad she shared it!

She had me at "quick."  The recipe had me at "freezer friendly."  These are the buzz words I search for nowadays.  I am always looking for something quick to make and is able to satisfy two thirty-somethings and a three years old.  The Baking Tot even helps out shaping the dough.

The recipe makes two pizzas, but I freeze half of the dough for a future dinner.  Unfortunately, we don't venture out into anything other than a good slice of cheese pizza (because of said Tot) but I have at least found some great products that make a darn good cheese pizza.

Now remember, the key for me here is *quick*.  So, I use Mario Batali Neapolitan Pizza Sauce.  This is my favorite store bought sauce thus far (liked it better than my homemade) and therefore I don't feel the need to make any and thus saving TIME!!!!

According to Cook's Illustrated, Kraft Low Moisture Mozzarella (Block) was amongst their top choices in grocery store cheeses a few months ago and it does a great job.  As for the beer, we use Shiner...because we are from Texas and that is just the law.
Please Note:  We normally don't cook in our underwear.  Baking Tot was in the middle of Potty Training Boot Camp, in which he hung around the house in undies for three days straight and was placed on the potty E-V-E-R-Y hour.  By the way, it was a BEAMING SUCCESS!!!!
Quick Beer Pizza Crust
yield:  2-10" pizzas
tweaked a slight smidgen by yours truly from Bluebonnets & Brownies

4 cups AP flour
A pinch of each, dried oregano & dried thyme
2 teaspoons instant yeast
1 teaspoon baking powder
1 1/2 teaspoon salt
2 tablespoons olive oil
1 bottle Shiner Bock Beer, room temperature
  1. Combine flour, herbs, yeast, baking powder, and salt into a bowl of an electric mixer fitted with a dough hook.  Mix until combined.
  2. Add the beer and olive oil to the dry ingredients and mix on slow speed for 1 or 2 minutes until ingredients combine.  Increase the speed to medium and mix for 7 minutes or until dough is smooth and doesn't stick to the bowl.
  3. Place dough in a lightly greased mixing bowl and let it rise for 30 minutes to 2 hours.
  4. Deflate dough and divide in half (one half for now, the other half for freezer in my household).  Shape dough onto a pizza stone or lightly spray baking sheet and let it rest for 5-10 minutes.  Shape once more to desired size.
  5. Preheat oven to 425 degrees.  Place pizza dough into the oven and par-bake for 5 minutes.
  6. Remove your crust from the oven and top with desired toppings.
  7. Bake for 15 minutes, until bottom is nice and crisp and top is beginning to brown.

Wednesday, July 6, 2011

What a Loser...Blueberry Pecan Sticky Buns

Well in my mind this is a winner!  That's right, I'm sharing a losing recipe with you guys.  I entered this recipe for Blueberry Pecan Sticky Buns in a Holiday recipe contest and, well, I never got a response back from the hosts.  I knew it was a risk entering a scratch dough into the contest and thought it would hinder my chances, but these are so irresistible.  The color alone makes it all worth while; a golden bread topped with an intense, glistening purple glaze.  It looks too amazing to eat!

Please don't be overwhelmed by the amount of instructions that come with this recipe (I have a feeling that is why it was overlooked in the first place); it is really easy and makes a beautiful dough.  And best yet, it can be made a day in advance, kept in the pan, placed over low heat on the the stovetop for about 5 minutes before turning it out onto a plate for serving.

Oh, and by the way a cheeseball won the $3,000.00 prize...a freakin' cheeseball!

Monday, May 2, 2011

Moms Love Breakfast (Recipe: Cream Cheese Strawberry Breakfast Buns)

If you haven’t noticed this mama really loves breakfasts and brunches. Its pretty obvious-I’d rather make a breakfast bread or cake than a traditional cake any day. Since Mother’s Day is around the corner I thought it would be nice to link up some of my favorite breakfast cakes…I think mom would really like one!

***postscript:  forgot to mention a little giveaway...here!  Monday, May 9!!!  Come check it out.
Chocolate Swirl Sour Cream Coffee Cake
If mom loves chocolate, she will definitely love this cake. Chocolate pecan streusel swirled in the middle and sprinkled on top. Perfect with a cup of coffee.
Blueberry Cream Cheese Pound Cake
Moist, tender, delicious, studded with blueberries and drizzled with a sugary sweet icing.
Buttermilk Pound Cake
Our household favorite. Moist and versatile. This cake is great for morning, noon or night-just add your favorite accompaniment.
Lemon Pound Cake
How many times do I have to say moist in this post? This cake is the pinnacle of moist thanks to a puckery lemon glaze. Perfect for that lemon lover.
Chocolate Chip Cornbread
A unique and tender bread that is not too sweet.

My mom’s favorite breakfast bread is Strawberry Cream Cheese Buns. Sweet, delicately flavored and ummm, well…yes, moist. Strawberry jam is swirled into the batter creating a pretty and tasty cake. Enjoy!
Strawberry Cream Cheese Breakfast Buns
source:  More From Magnolia
makes 9 buns
Bun
1 3/4 cups flour
1 teaspoon baking powder
1/2 teaspoon baking soda
1/4 teaspoon salt
1/2 pound (one 8-ounce package) cream cheese, softened
1/2 cup (1 stick) unsalted butter, softened
1 cup sugar
2 large eggs, at room temperature
1/4 cup milk
1/2 teaspoon vanilla

Topping
1/2 cup strawberry preserves

Garnish
Confectioners' sugar
  1. Preheat oven to 350 degrees.  Grease and lightly flour 9 large muffin cups.
  2. In a small bowl, combine flour, baking power, baking soda, and salt.  Set aside.
  3. In a large bowl, on medium speed of an electric mixer, beat together the cream cheese, butter, and sugar until smooth.  Add eggs and beat well.
  4. Add dry ingredients in two parts, alternating with the milk and vanilla.
  5. Spoon the batter into the muffin cups, filling them about two-thirds full.  Drop 3 small dollops (about a teaspoon each) of raspberry preserves onto the top of each buns and using the tip of a knife, swirl the preserves into the batter, forming a decorative pattern.
  6. Bake for 25-30 minutes, or until a cake tester inserted in the center of the bun comes out clean.
  7. Allow buns to cool for about 30 minutes before sprinkling with confectioners sugar.

Monday, March 21, 2011

Well that there is Yankee Cornbread!

I grew up eating cornbread that came from a white and turquoise box.  It is sweet and delicious and was one of my favorite things to eat at my childhood table.  I remember slicing a piece in half and slathering it with butter at the end of a meal.  It was so tasty and sweet, it could rightfully pass for a dessert in my book.  But then again, I couldn't wait for morning to come so I could enjoy a slice for breakfast as well.

According to my father, who was raised on homemade southern cornbread, this cornbread from a box was "Yankee Cornbread."  I think his argument was that it was too sweet, or maybe it was because it was from a box, or because my mom was from Nebraska (and yes, I realized Nebraskans are Mid-Westerners-but to some Texans anything north of the Red River would be considered 'Yankee')...whatever the reason that cornbread was not *real* cornbread.

Well, I wonder what he'd think of this cornbread.  It is sweet and wait for it...wait for it...OK here it is...and loaded with CHOCOLATE!  It would be perfect for brunch served with coffee or tea.  And I'm pretty sure it could be a yummy midnight snack too.

Casa Luna's Chocolate Chip Cornbread
Bon Appetit October 2008
serves 8
PRINT ME
Nonstick vegetable oil spray
1 1/4 cups flour
3/4 cup cornmeal
1/4 cup sugar
2 teaspoons baking powder
1/4 teaspoon salt
1/2 cup semisweet chocolate chips
1 cup whole milk
1/4 cup canola oil
2 large eggs
  1. Preheat oven to 375 degrees F.  Spray 9x5x3 inch metal loaf pan with nonstick spray.
  2. Whisk flour, cornmeal, sugar, baking powder and salt in a large bowl.  Stir in chocolate chips.
  3. Whisk milk, canola oil and eggs in a medium bowl.  Add milk mixture to dry mixture; stir until just blended.  Transfer to prepared pan.
  4. Bake bread until tester inserted into center comes out clean, about 35 minutes.  Cool 10 minutes.  Invert cornbread onto a rack.  Cool slightly.  Serve warm or at room temperature.

Thursday, December 9, 2010

The One That Almost Got Away (Pumpkin Cream Cheese Muffins)

I have to admit, nuts would make them more attractive...but the hubs does not like nuts!  Oh well!
This is a love story...about me...and a muffin.  Starbucks pumpkin cream cheese muffin to be exact.  I rarely walk in to a Starbucks, it really is a rare occasion.  But one brisk morning I found myself shoving my sons stroller into the store patiently awaiting for Pottery Barn to open...I had arrived an hour early, walked around the shopping center and finally found a warm place to nest.

And then, there it stood across the table from me...a pumpkin cream cheese muffin.  Oh my goodness-it was delicious and I was in love.

So I went home and tried to make my own version.  I scratched my recipe down on a tiny piece of paper and shared it with my family.  They loved it.  But then...I lost the recipe.  Earlier this summer to my delight I found it...and then, lost it AGAIN!  I thought it just wasn't meant to be...

One day as I was digging through my bakeware cabinet I saw a tiny piece of paper wedged between two tart pans.  The muffin and I were reunited again!  I was so excited (so was the hubs) that I made the muffins immediately.  They are just so darn good!  I mentioned that I was going to take the rest of them to work and The Hubs' face clearly stated, "I don't think so!"  They are that good-we ate the whole batch...with the help of The Baking Toddler, of course.

To learn more about making the perfect muffin go here!
A perfect breakfast treat!
Pumpkin Cream Cheese Muffins
yield: 1 dozen

4 oz. cream cheese, room temperature
1 T. butter, room temperature
½ t. vanilla extract
3/8 c. powdered sugar

1 ½ c. flour
1 ½ t. cinnamon
¾ t. nutmeg
½ t. cloves
½ t. ginger
¼ t. allspice
½ t. salt
½ t. baking soda
2 eggs
1 cup sugar
½ c. + 1/8 c. vegetable oil
1 c. canned pumpkin
Pumpkin seeds or Walnuts for the topping

1. Lightly pan spray the tops of a regular sized muffin pan. Line pan with muffin cups. Preheat oven to 350°.
2. Cream the cream cheese, butter, vanilla and powdered sugar in a small bowl. Place twelve ½ tablespoon mounds on a parchment lined tray and place in the freezer until firm.
3. Sift the flour, cinnamon, nutmeg, cloves, ginger, allspice, salt and baking soda into a medium sized bowl.
4. In a separate bowl, combine the eggs, sugar, oil and canned pumpkin until smooth.
5. Gradually fold the flour mixture into the egg mixture using a large spatula until just combined.
6. Spoon batter into muffins cups, about ¾ full. Pull the cream cheese out of the freezer and gently roll each mound into a ball. Place the cream cheese balls into the center of the batter and lightly press down. Top with seeds or nuts, if desired.
7. Bake at 350° for 20-25 minutes
Print Me!!!

Monday, October 18, 2010

Snickerdoodle Mini Muffins

The other day I saw a tee shirt advertised in a magazine that said, "Muffins are just ugly cupcakes."  For some reason I took offense to this, gasped, and quickly came to their defense "ARE NOT!"  Except, there was no one to argue this point with, the only other person in the room was BabyBoy, and there is not much talking coming from him!  Regardless, I found this statement to be wrong.

I love muffins.  They are so cozy and warm and I find myself "popping the top" much like Elaine had done on Seinfeld (except I eat the stumps too).  Similar to pancakes, the secret to a great muffin, besides using fresh ingredients, lies within the mixing.  Overmixing can produce a rubbery, rather than fluffy, texture.  And I suppose then, and only then could a muffin be called ugly!

Making Muffins, Step By Step
  1. For best results bring milk, eggs, and butter to room temperature.
  2. Whisk together dry ingredients in one bowl and wet ingredients in another.
  3. Make a well in center of dry ingredients.
  4. With a large rubber spatula, fold wet mixture into dry one, with few strokes as possible.
  5. Fill buttered muffin tins about three quarters of the way with batter.  This leaves enough room for a crumb topping and makes muffins that are the right size for snacking.

You're Not So Ugly Snickerdoodle Mini Muffins
yield 2 dozen
Print Me!!!

10 T. (1 ½ sticks) unsalted butter, melted, plus more for the pan
1 c. sugar
1T. plus 1t. ground cinnamon
1 ½ c. flour
2 t. baking powder
½ t. salt
½ c. buttermilk
1 large egg

1. Preheat oven to 375°F. Butter a mini-muffin tin, and set aside. In a small bowl, combine ½ cup sugar and 1 tablespoon cinnamon; set aside.
2. In a large bowl, combine flour, baking powder, salt, and remaining teaspoons cinnamon; whisk to combine.
3. In a separate small bowl, combine 6 tablespoons butter, remaining ½ cup sugar, buttermilk, and egg; whisk to combine.
4. Using large rubber spatula, fold butter mixture into flour mixture; use no more than 10 strokes. The mixture should be lumpy.
5. Spoon 1 tablespoon batter into each prepared cup, and bake until tops are nicely golden, about 8 minutes. Remove from oven; let cool in pan 10 minutes before transferring to rack to cool
6. Dip top of each muffin in remaining 4 tablespoons melted butter and roll in reserved cinnamon mixture. Serve warm or room temperature.

Monday, March 22, 2010

Rolling In Dough

Do you remember Seventeen magazine? I used to get it every month, except I was thirteen at the time. I asked (begged) for a subscription because the most popular girl in school was constantly reading it in class and I was curious about its content.

Clothes, makeup, hair, cute quizzes, q&a about sex (though being a daughter of an OB-GYN RN, I was very well informed on sex-think diagrams, graphs and medical text books people! So reading the sex questions didn't really hold my interest.) Those were the days of Niki Taylor, Girbaud, big bangs and teased hair.

I enjoyed all of its girly content. Seventeen inspired the all too critical, crucial and very important first day of high school outfit. This was a make or break moment-not only was it high school, but I was also the "new girl." (Ughh!) Well, inspiration-not exactly, I took the look right off of the cover. The hair, the red tank top and plaid shorts-it was too cute and one of my favorite outfits of all time.

Not only did Seventeen give me wardrobe and hair inspiration but it also budded my inner foodie. In the very back of the magazine there was a recipe section. Believe it or not, I'd always turn to this page first. This was the beginning of life long recipe clipping. In fact, my very first clipping was a recipe for pizza dough.

Last week, as I was searching the internet for pizza dough recipes, I was reminded that I actually kept that recipe! A 20 year old recipe straight from the pages of my favorite teen magazine! I remember it being so challenging when I was a girl. Now, being a former scratch baker, I couldn't believe how beautiful and delicious this teen magazine recipe was. It will definitely be sticking around for another 20 years.
Whole Wheat Pizza Dough
One 14 inch round pizza

1 1/2 cups warm water
1 Tablespoon active dry yeast
1 teaspoon sugar
1/2 Tablespoon salt
1/4 cup olive oil
1 1/2 cups whole wheat flour
2 cups all purpose flour
  1. Combine water, yeast and sugar in a large bowl. Let yeast activate, about 5 minutes. Add olive oil, half of the flour and salt. Stir vigorously with a wooden spoon. Stir in remaining flour, and transfer dough to a flour covered surface.
  2. Knead (fold dough over repeatedly with one hand while working it with the knuckles of your other hand) for 5 minutes or until smooth. Place dough in a clean bowl, cover with a kitchen towel or pan sprayed plastic wrap, and let rise in a warm place for one hour or until doubled in size. Punch down the dough.
  3. Preheat oven to 400 degrees. Grease baking sheets with olive oil or prepare your baking stone. Stretch or roll out dough into a 14 inch circle. Place on prepared baking sheet or stone. Add desired toppings, and bake for 20 minutes or until crust in golden brown.
You can refrigerate the dough after step 2 for several hours or up to two days. In this case, place the dough in the refrigerator for about 40 minutes, punch it down once more and place in a plastic bag.

SHOUT OUT!!! My friend Meghan, over at You're Gonna Bake It After All has an awesome giveaway. It is really cool because the lucky winner can choose between a bamboo cutting board, pizelle maker or a wine rack. It is a very generous giveaway and its easy to enter. Leave a comment on her blog post and/or mention the giveaway on your blog. Good Luck! (and wish me luck too!)

Monday, March 8, 2010

Giant Soda Muffins

One of my favorite times to visit San Antonio's River Walk is during St. Patrick's Day. They do their best to dye the river green and masses of St. Patty's Day partiers drown themselves in green beer and hope not to fall in the river.

You see, my husband and I do not drink alcohol (ok, more like its a rarity.) He is displeased with the taste and it burns like fire in my stomach (which I was later told was not normal) So instead we are mere observers.

The first time we had gone to the River Walk on St. Patrick's Day was by pure coincidence and it ended up being a blast. Though the river dye had faded back to the murky brown, we enjoyed viewing all of the party-goers and drunkards. We stayed up into the night, walked the river route and parked ourselves on a bench.

Sad but true, not only are we observers-but we are also poking fun at the lushes behind their back. So all of the obnoxious, loud, puffed up like a rooster men and the sloshed up, 'now I think I'm really sexy' women gave us plenty to talk and laugh about that night. We only saw one fall into the depths of the murky river but she was quickly recovered. I wonder if she thought she was super sexy after that?

This year my husband surprised me with a weekend get-away, the first since our 18 month old was born. This time, the trip is with mixed emotions-excited for the break but nervous because it is my first time away from my baby boy. So, Casa Rio, Schilo's Delicatessen (pronounced she-lows), Mi Tierra, Pat O'Brien's...here we come!

Giant Soda Muffins
Yield: 6 large muffins
These muffins are similar to Irish Soda Bread. They are very large and delicious for a St. Patrick's Day Breakfast. Serve slathered with butter and jam. Then, you can enjoy that green beer later on in the day.

Nonstick spray
1 1/2 cups all purpose flour
1 cup whole wheat flour
2 tablespoons sugar
2 teaspoons baking powder
1/2 teaspoon baking soda
1/2 teaspoon salt
2 tablespoons unsalted butter, room temperature
1 cup golden raisins
1 1/4 cups buttermilk
1 large egg
  1. Preheat oven to 400 degrees. Spray six jumbo (1 cup) muffin cups with nonstick spray.
  2. Sift next 6 ingredients into a large bowl. Add butter, blending with fingertips until incorporated. Stir in raisins.
  3. Whisk buttermilk and egg together in a small bowl. Add to dry ingredients. Stir to blend. Spoon batter into muffin cups.
  4. Bake muffins until tested inserted into center comes out clean, about 20 minutes. Remove muffins from pan and cool slightly on rack.